
Home Renovation Before and After.
What a lot of work!
This home renovation was the one that has presented us with the most surprises, issues, and very hard work to date. The yard was completely overgrown and couldn’t be cut easily because there was a partial deck under all the weeds, as well as some landscape beds that I wanted to keep. But, I’m getting ahead of myself, I should tell you a little about me and should show you the home renovation in a more logical order, starting with the front.
My home renovation blog
So, about me… you can see my profile in the sidebar and you can sign up to receive email notifications of future blogs and info, or connect with me on social media (I’d love that). I love home renovation and investment, and have started blogging about my results in the hopes of helping and inspiring others who might want to go down this path of home renovation and sales.
In my posts, I will do my best to provide links to the products I’ve used. (As an Amazon Associate I earn from qualifying purchases.) This current home renovation blog will take you room by room through a 1960’s ranch style house renovation, but if there’s any other info you’d like, please feel free to comment or message me, and I will be sure to answer. I always wanted someone to be transparent with me regarding work done, supplies, time involved, costs, etc before I got into a project, and I’m happy to be transparent with you if it will help you in your next steps.
Now, back to the house….
Home Renovation Exterior Before and After
You could actually barely see the front of the house due to the overgrowth of plants and landscaping that had gotten out of control.
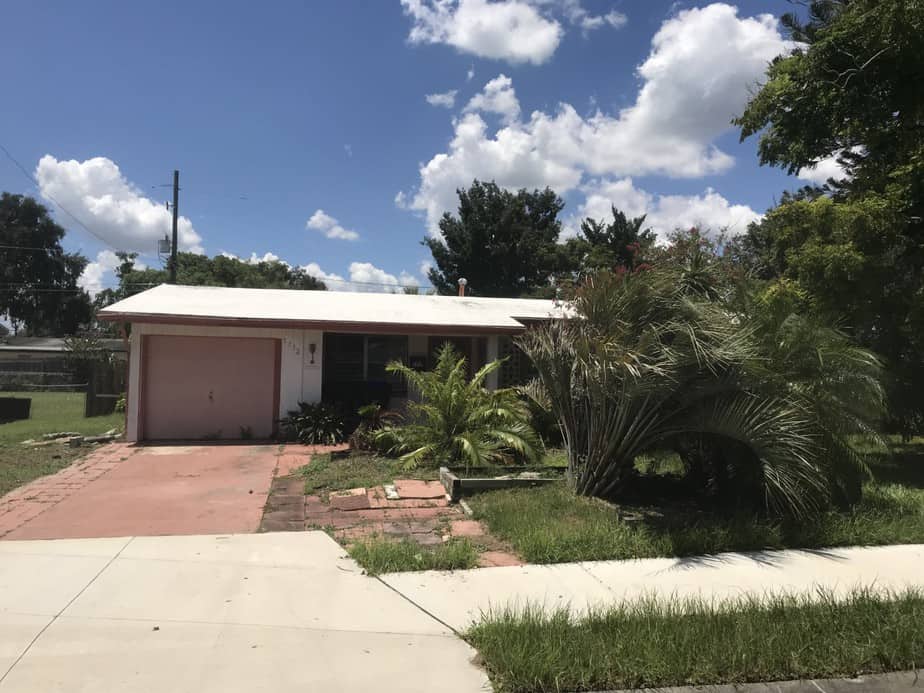
Here’s another picture showing more of the house once we cut down some of the plants. You can see the roof was a white foam-ish material, and there was a garage but this garage had rotten wood on the outside and didn’t appear to be permitted, so we thought it was best to remove the rotten exterior wall and open it up.
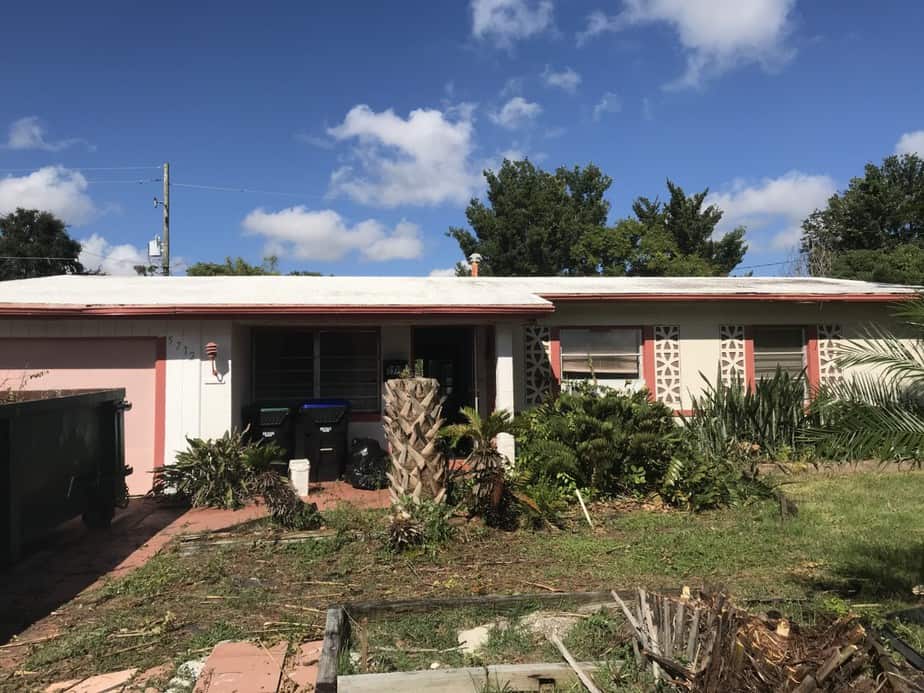
Here’s the “after” photo of the front, showing the opened up garage, and a brand new roof. We kept the Sago Palms and repainted the house to a more modern color, and painted the decorative designs that were part of the house and that now look like beautiful intricate shutters.

The paint colors used in this home renovation were, Sherwin Williams Refuge for the door, Sherwin Williams Agreeable Gray for the body, and then Black and White for the trim and accents.
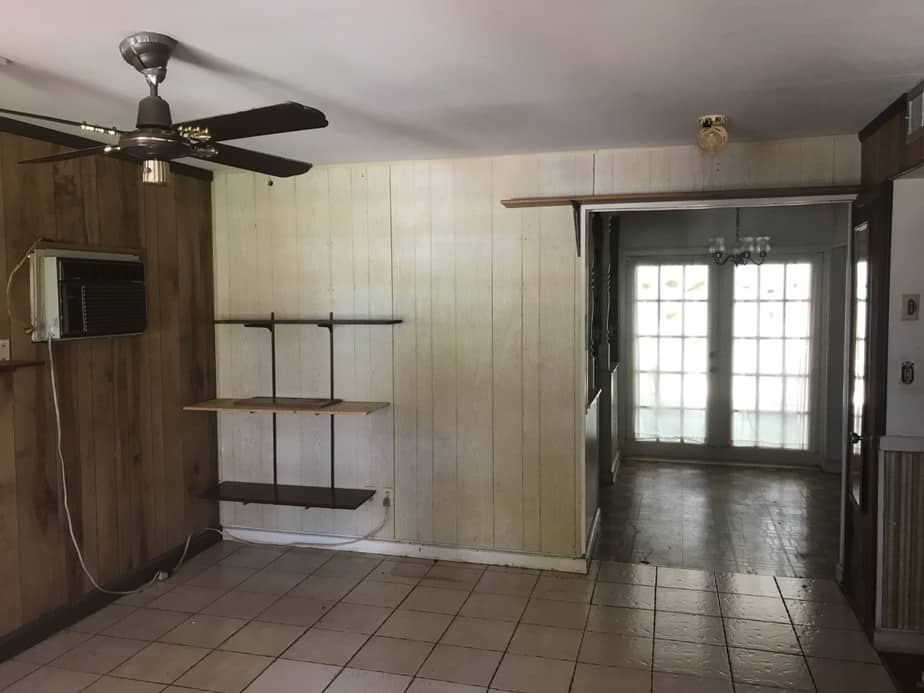
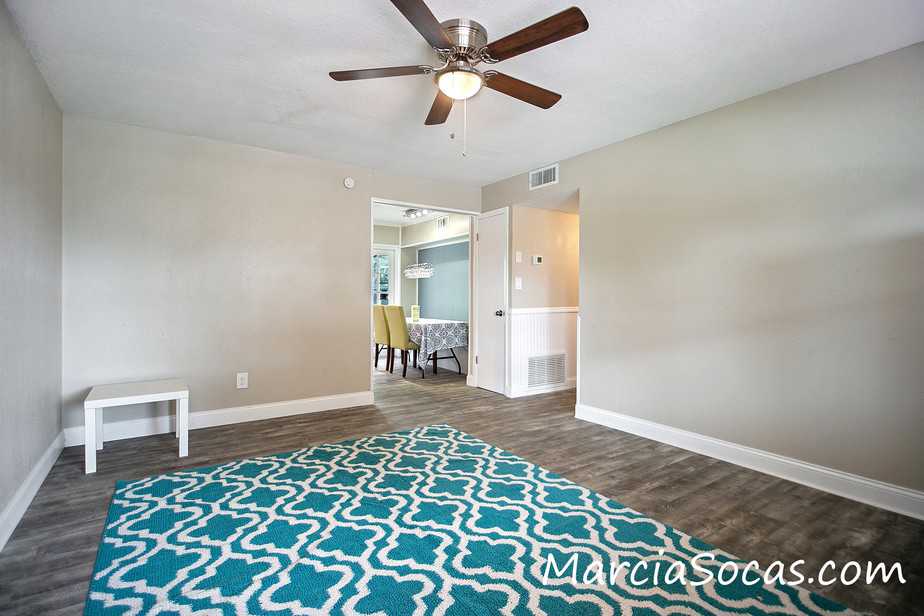
Living Room
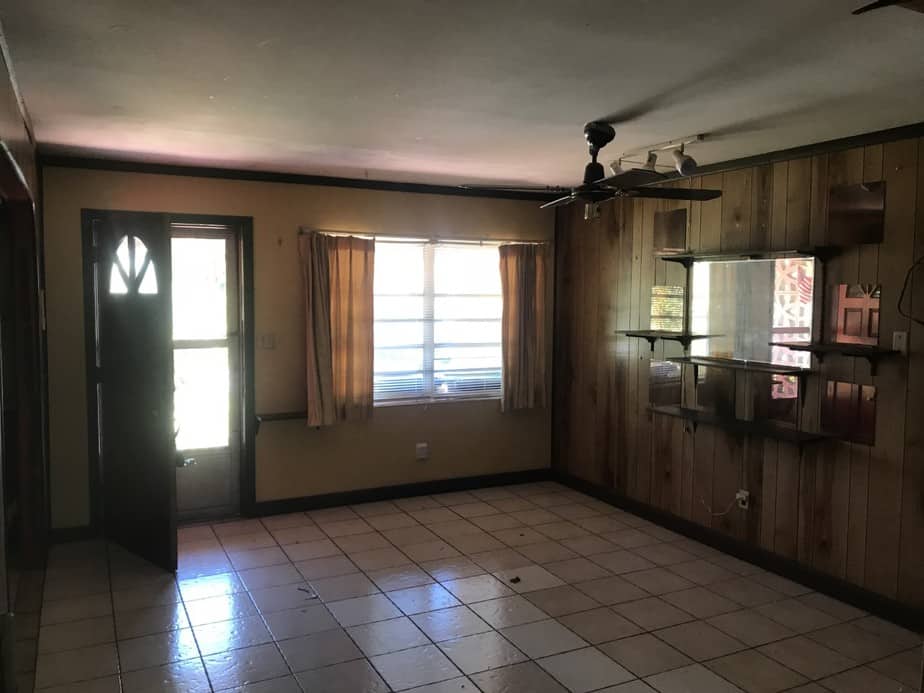
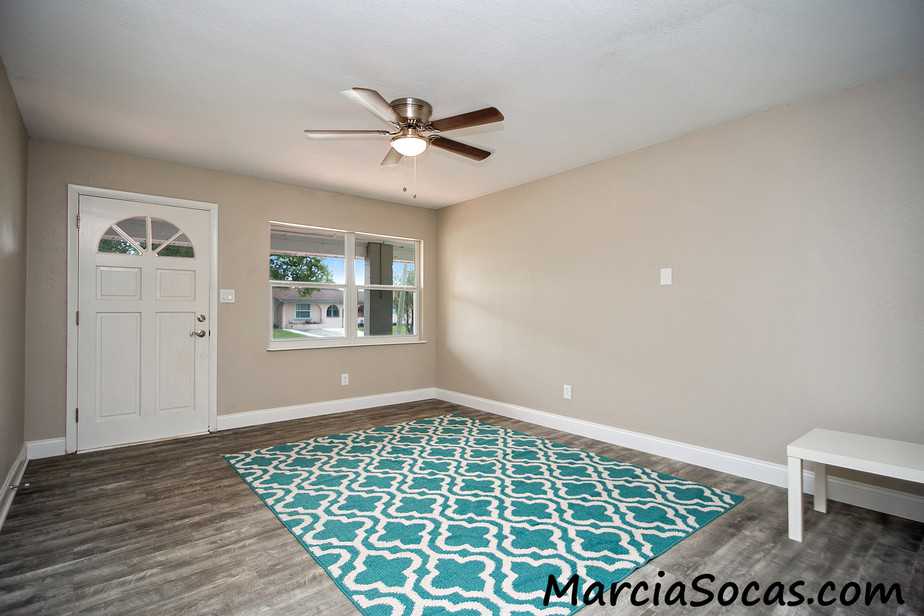
Here’s a link to show some inexpensive rugs, in case you need them for staging or for your own home renovation.
Also, I’ll provide a link to Vinyl Plank flooring similar to the one we used. It was very very very easy to install and didn’t require the use of a professional flooring installer (saving us $$$)!
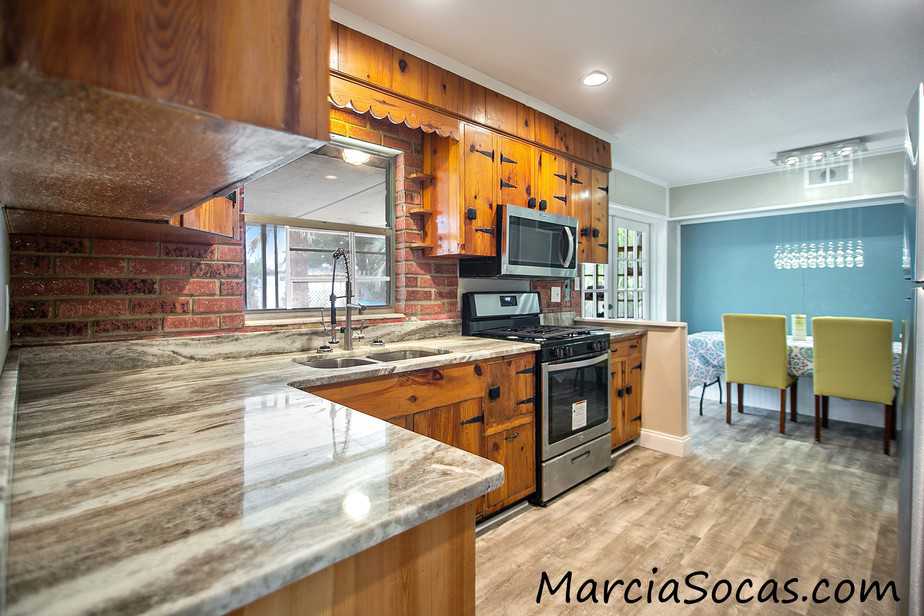
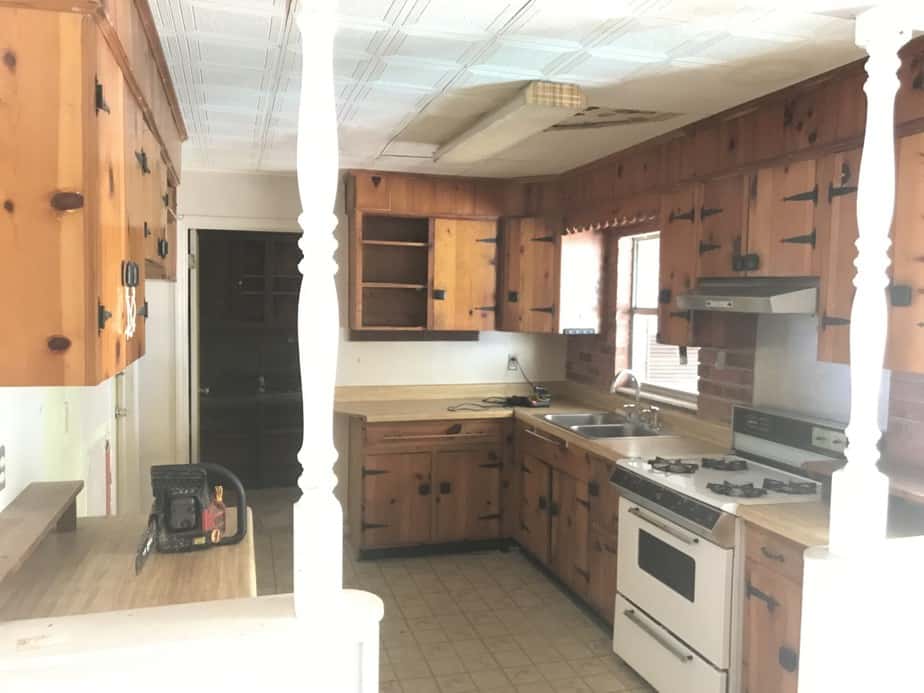
Kitchen
From here, we moved into the kitchen. It was pretty unappealing, with strange tiles as the ceiling, two bannister looking columns blocking the view/sightline, old cabinets, a fluorescent overhead light, and old cabinets. When I looked closer at the cabinets though, I started to fall in love with them. I really liked the iron strap hinges, and the cabinets themselves were extremely sturdy. An internet search told me these were knotty pine wood cabinets, and I really felt I needed to keep them to preserve some of the character of the house. (My husband disagreed with my choice, but I won out on this one!)
Degreaser and a light stain really did the trick on the cabinets! We also removed the fluorescent light and ceiling tiles, and added recessed canned lights and a new ceiling. We had a granite installer install Fantasy Brown granite, and the cost of that was extremely reasonable (under $1000 for the material and installation). We also purchased a stainless steel appliance package (the appliance packages often go on sale for the entire set) *Here’s a link to Home Depot stainless steel appliance packages, you can see you can get a whole stainless steel kitchen package priced for under $1700 at the time of this post.
We also removed the bannister type columns to open up the look of the kitchen. Oh, and the vinyl plank flooring we installed extends into the kitchen too, giving the whole house a uniform look.
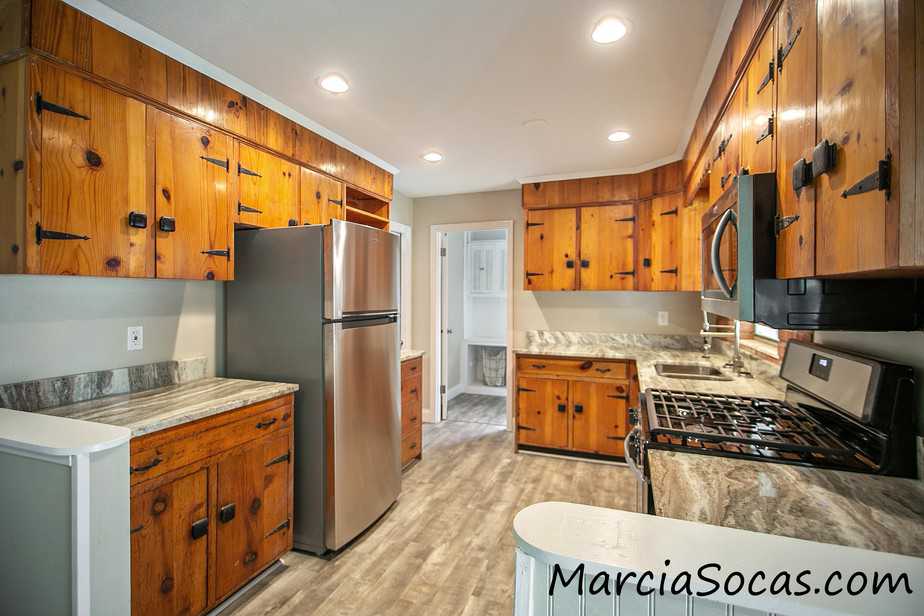
In this photo below, you can also see that we kept the original brick backsplash, and you can also see the new faucet we installed. I actually do this on all of our renovations because the faucet has such a big impact. When I’ve looked for this type of faucet in the stores, they’ve been quite expensive, but we get it for much less through Amazon (like, significantly less). I’ll try to post a link to it below the picture so you can see the price. 
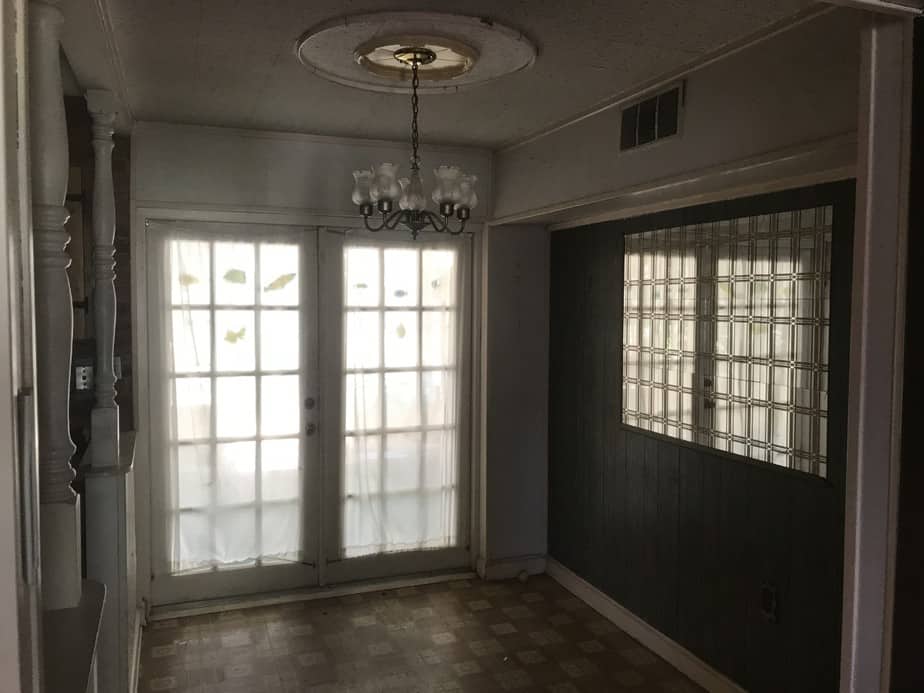
Dining Room
Now on to one of my favorite little challenges of the house. The dining space was super narrow, and it was going to be difficult to get a table and chairs in there comfortably. Again, I’m sorry this picture is so dark!
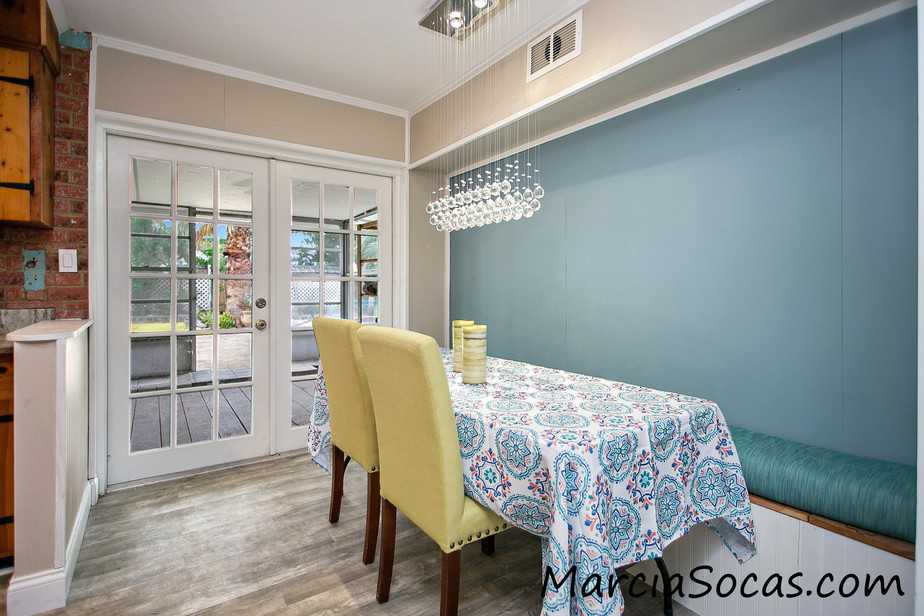
I immediately tried to focus on using that little recessed space in the wall. Using 2x4s we built a bench seat in just a few hours, and applied wainscoting along the front. In this picture below, the bench seat isn’t completely finished which is why you can see the bit of wood under the cushions. I always get a little too anxious to take the “after” picture!
I love the way the accent color looks in the alcove (it was just paint left over from the front door). We also moved the light fixture location and offset it so that it would hang over the new “center” of the room. This light fixture is amazing in person and looks really expensive, but it wasn’t at all. I’ll post the link to it below in case you’re interested.
Now, it did take a while to put the light up because I had to manually string and clip each hanging bulb. For me, the hour or so that it took was worth the huge discount in price from a ready-to-hang light from a more expensive store. Actually, the light is the one thing that the wife of the couple that ultimately bought the house fell in love with most.
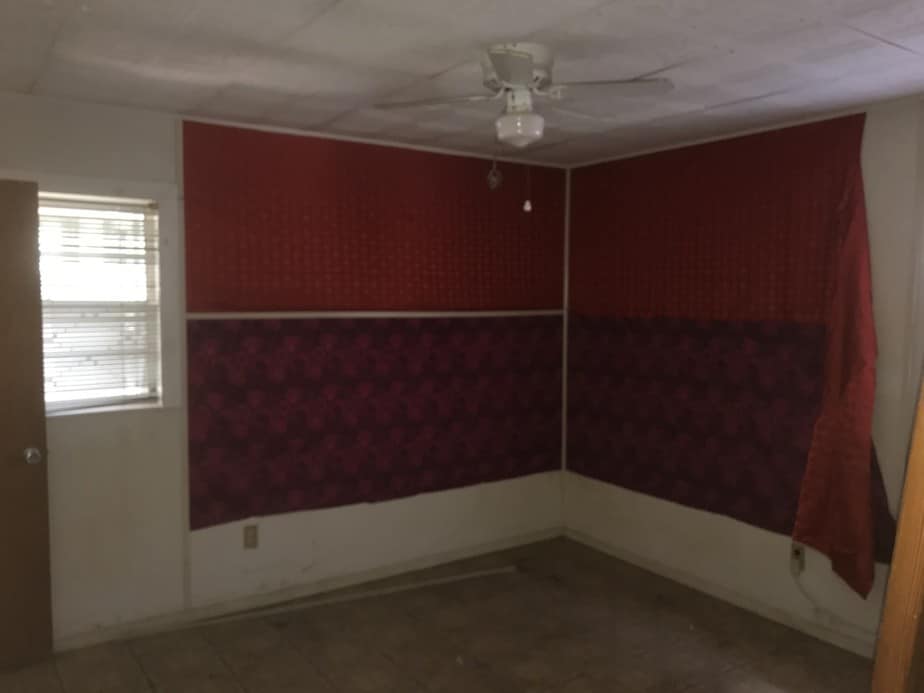
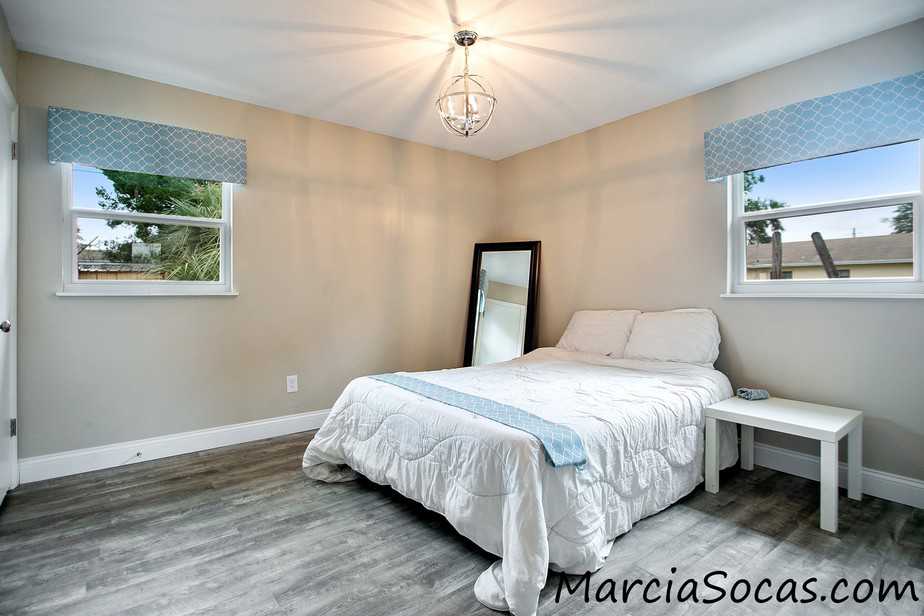
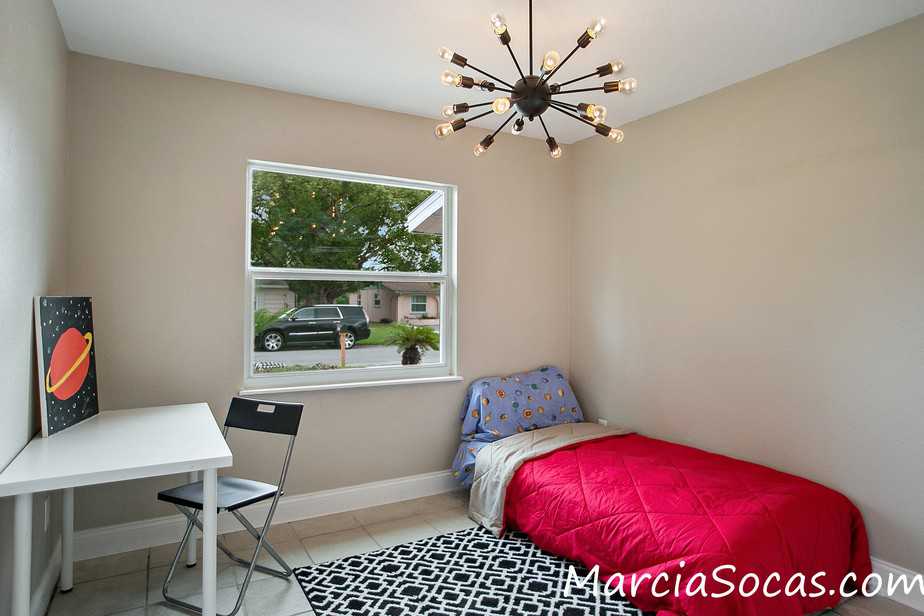
Bedrooms
The bedrooms were pretty dark and dingy. This room wasn’t actually painted red, it had red fabric stapled to the walls. You can see it coming off on the right side of the picture.
We repainted, added a more modern light fixture, and continued with the vinyl plank flooring. Dressing the room up a little bit was fun and inexpensive. That’s actually a $40 inflatable mattress that is easy for me to use for staging in houses. It’s proven to be a great trick for me to easily dress up a room and give a buyer a sense of what size furniture will fit and how it will look. For the window coverings, I actually used a piece of hard poster/foam board from the dollar store. I covered it with some batting and fabric that I had at home and voila! Now the windows look more complete. If you want a tutorial on how to do this cheap $5 window treatment just let me know and I will create one.
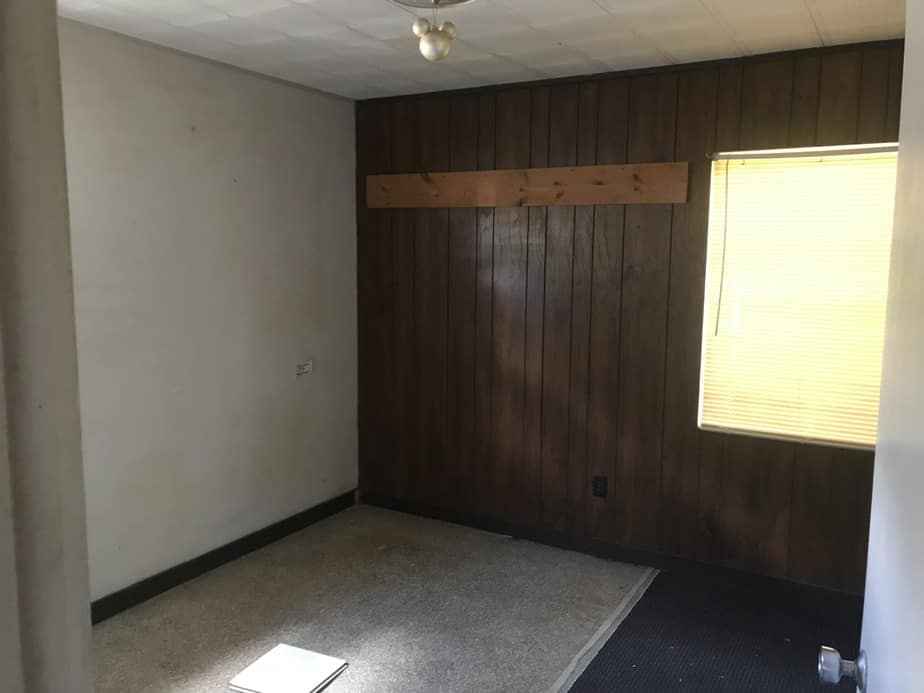
Here’s room number two, which had paneling that we removed.
Here it is “after”:
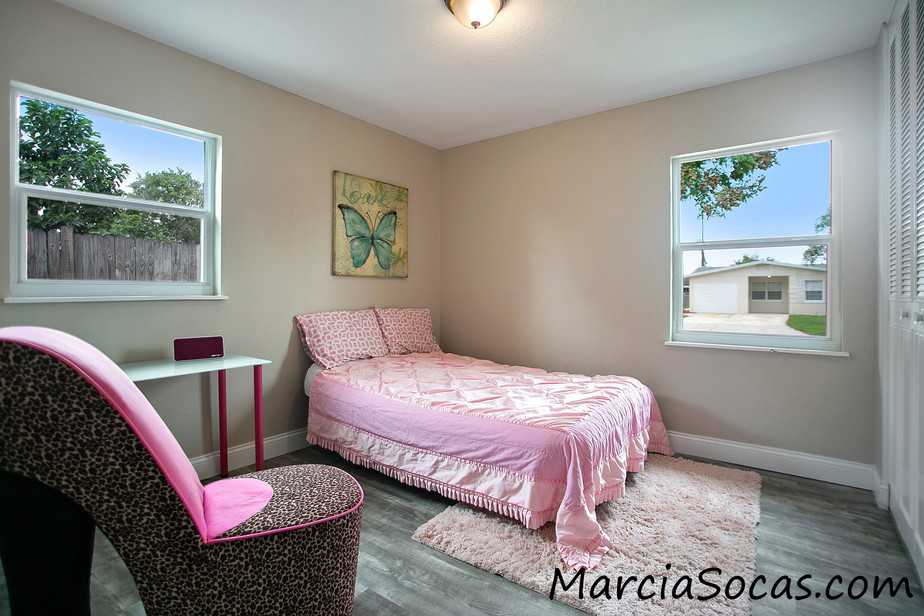
This third bedroom in this home renovation was a little more work because the prior owner had removed a wall and made this an open area off of the front of the house. We closed it back up, repainted, did the floors, and added this cool new Sputnik looking light. I will provide a link to the light under the picture because this is the cheapest I have found it (it does require assembly so be ready to put in the time for that).
Bathrooms
Now the bathroom!! The contract between the before and after pictures here is my favorite. The bathroom had a tile wall between the toilet and counter, an old vanity, and really old shower.
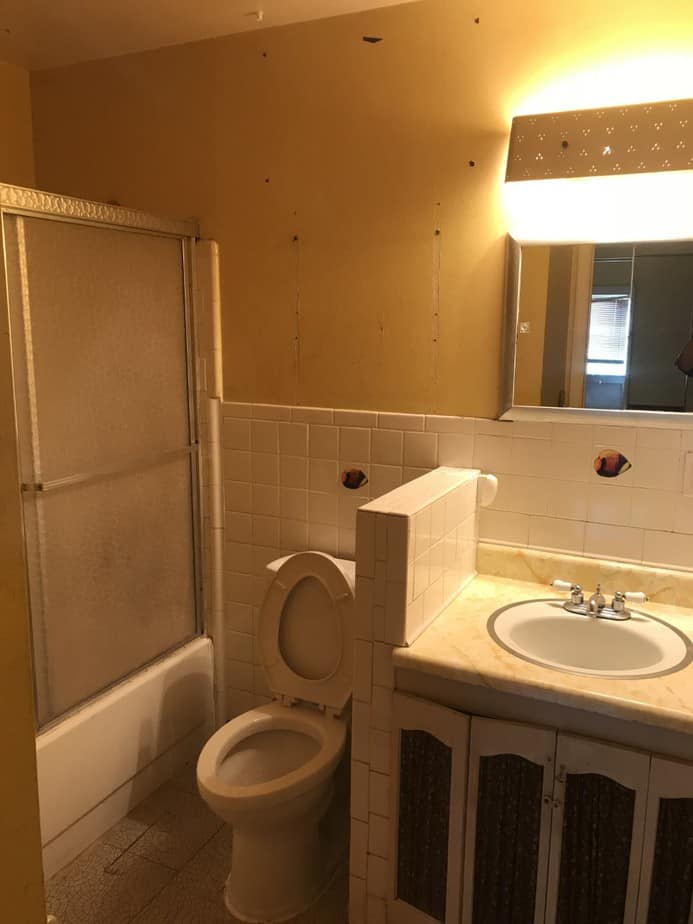
We re-tiled the bathroom shower and added in a decorative trim. The fixtures were changed out for new ones, a new vanity installed, a new mirror (which really was not large enough), and new vanity lights.
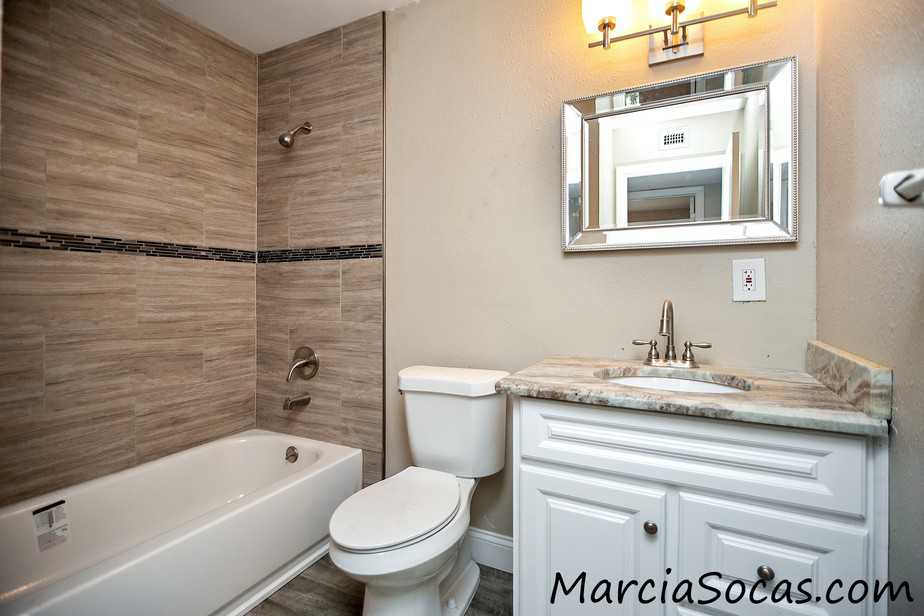
Here’s a link to some great looking tile from Home Depot and at the time of this post, it’s just around $1 per sq ft, which is a pretty great price and keeps material cost for redoing an entire shower surround quite inexpensive.

Once we tackled this hall bath, it was time to move to the master bath.
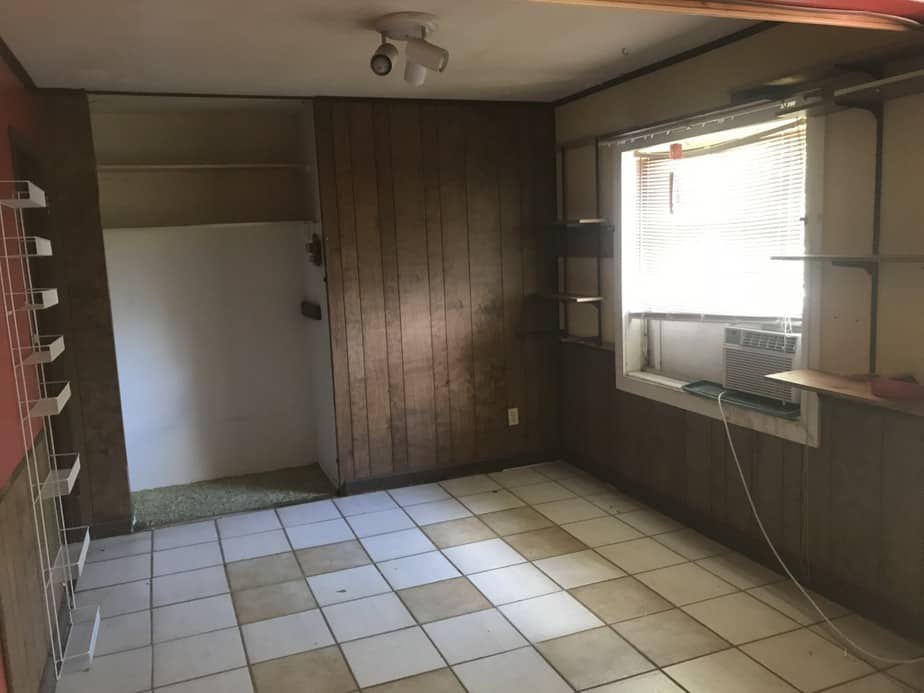
The master bathroom was really tiny and hard to photograph. It also had a strange covering on the walls. It wasn’t drywall, it wasn’t wallpaper, it was like a plastic veneer. So, improvements in this bathroom were replacing the vanity, replacing the toilet, and I also installed a very fun pattern of peel and stick wallpaper. No adhesive or mess, just peel the backing and stick it on. Many stores carry these, I’ve seen a few in Home Depot, a section at Target and Wal-Mart, and they’re also on Amazon. I’ll provide a link after the before/after photo below. I love using these for quick home renovation and have used them to spruce up rentals easily.


Here’s a link to the specific wallpaper I used.
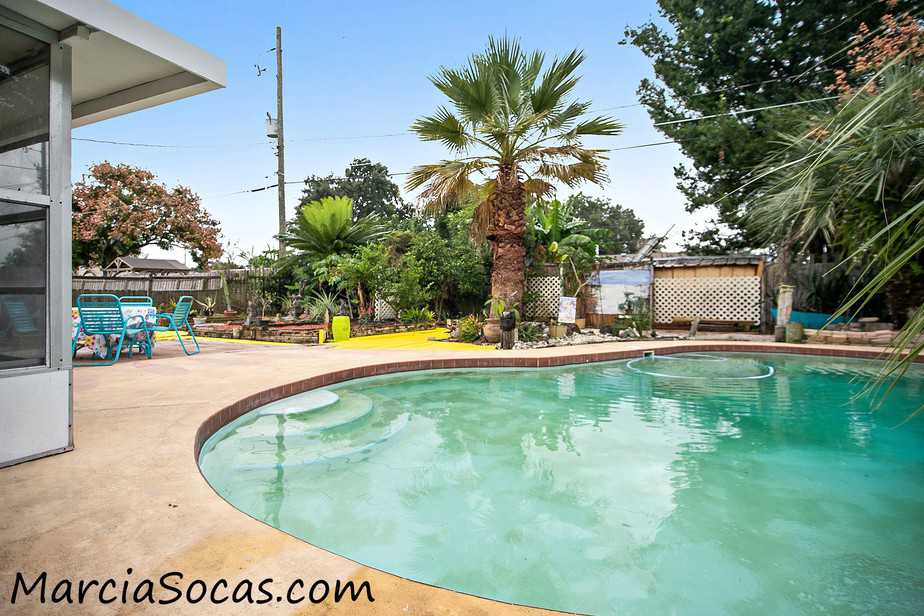
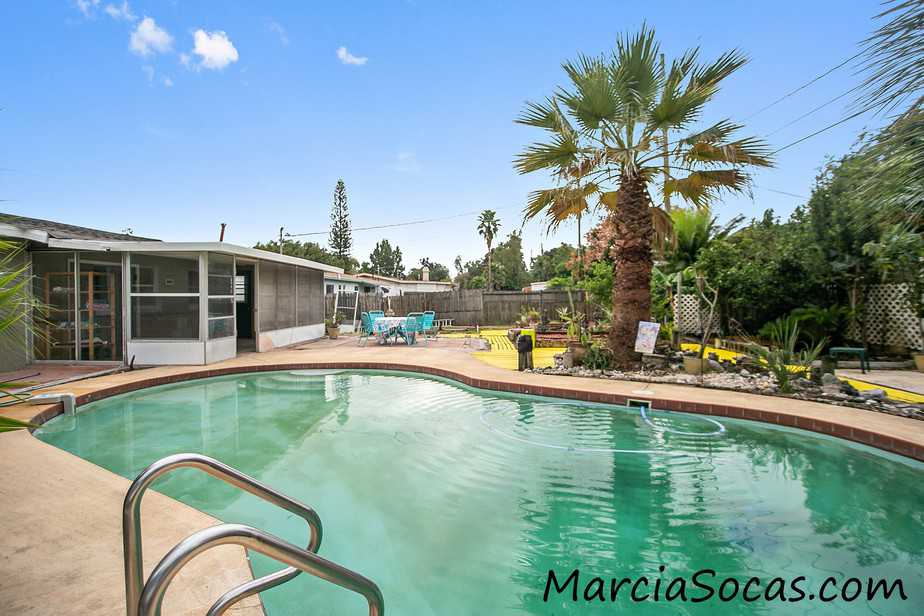
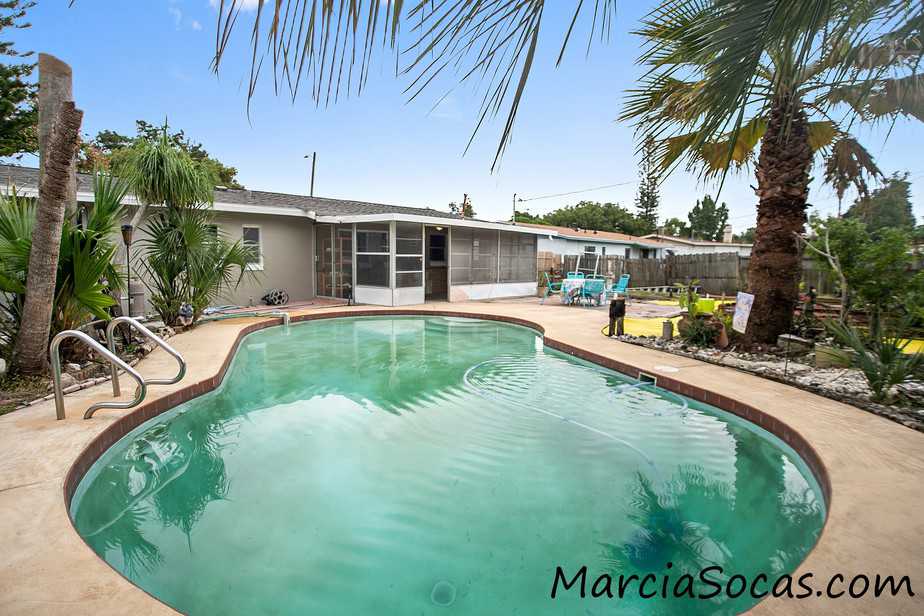
Back Yard
The back yard of the property was where we perhaps bit off a little more than I anticipated. The yard was really big, and had a pool, but there were a lot of home made porch structures that needed to be removed, as well as a lot of overgrown brush and landscaping. Here are just a couple before and after photos of those.
Here’s a before and after of part of the yard which was very overgrown. Once we got in there, we found raised planting beds, and several cool statues which we cleaned up and returned to the beds.


I wish I had taken more before photos of the pool from different angles so you could really see the difference, but it was so overgrown and there were areas I was afraid to step in, so I wasn’t able to get more shots, but you can kind of get an idea of it here: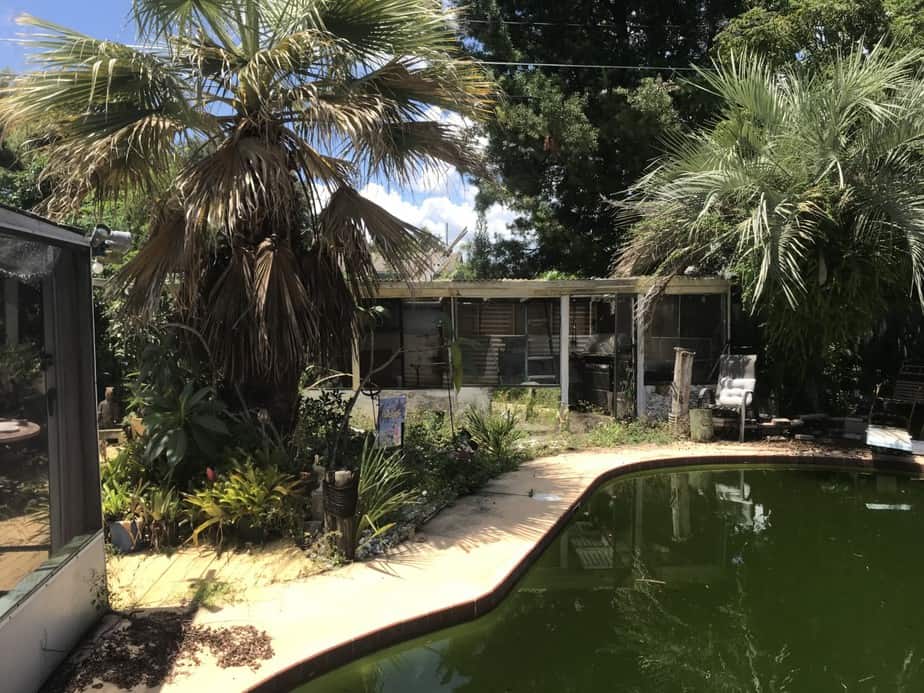
These photos were taken during the cleanup, there was still more to be done with the pool, but you can see from these how it was coming along.
I hope that this home renovation post has helped and inspired you to see that you can do this too! We sold the home for a record high price in the neighborhood.
And, if you enjoyed this “before and after”, here’s another one you might enjoy:
Harry Potter and Disney Princess Rooms!
If you’re ready to get started, here’s a link to Home Depot so you can start pricing your supplies!
Thanks again for reading and I hope you’ll let me know how your project goes.
2 thoughts on “Complete home renovation & flip, Camellia Gardens, Orlando”