
Recently I helped my son Eric decorate his Airbnb home. He goes to school at the University of Alabama and is a student there.
He decided that, rather than have full time roommates, he’d live in a home and pay the monthly mortgage by Airbnb-ing the property during busy game day weekends.
So, we worked to remodel the house and make it very football and U of Alabama themed.
You can view the entire renovation and before and after photos of the Alabama Airbnb here.
In this post, I’m reviewing just one DIY project that we undertook.
The closet door makeover.
We wanted to make the plain hollow core closet doors look better, but we were on a limited budget. So a little bit of wood and some black paint really helped to transform these doors on a super low budget. And we avoided the expense of new doors. Please note: We worked on interior doors for this project, and I’m not sure if it would work as well for exterior doors, since our project involved liquid nails and I worry that the temperature changes might affect the result over time.
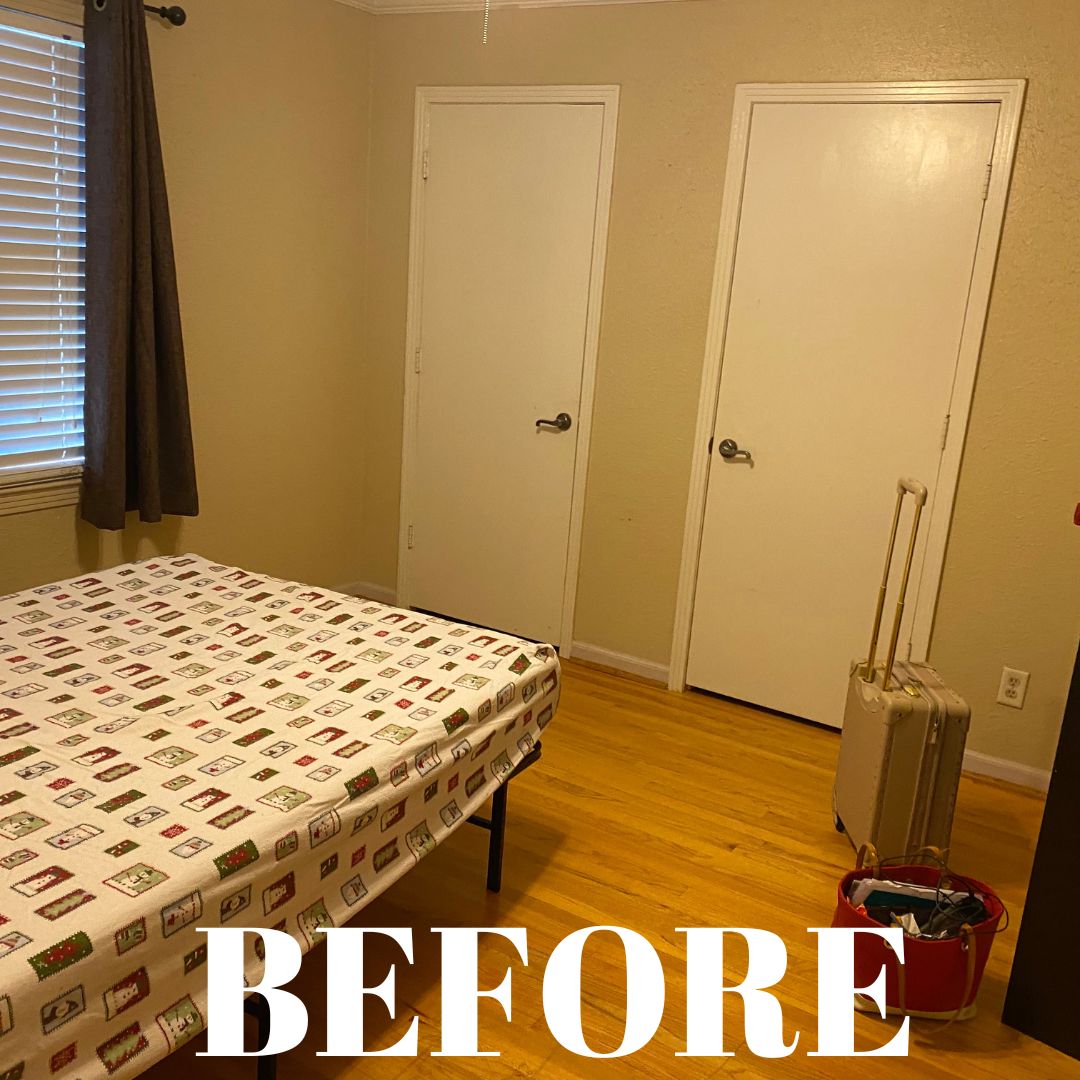
Where We Started
The doors shown in this closet makeover were hollow core doors that went to the bedroom closets. They were functional as an interior door, but they were really ugly closet doors that could really benefit from a closet door makeover. The steps below proved to be a great way give our room a classy and also vintage look–these sets of doors were in the “olde Alabama” room in our Airbnb transformation.
In the project, I will try to provide affiliate links to the products we used, in the hope that they’ll help you. As an Amazon Associate, I earn from qualifying purchases. This means that I’ll earn a small commission if you use the links provided, but it does not change your cost in any way.
Here’s how we did it:
Closet Door Makeover, Step by Step Tutorial:
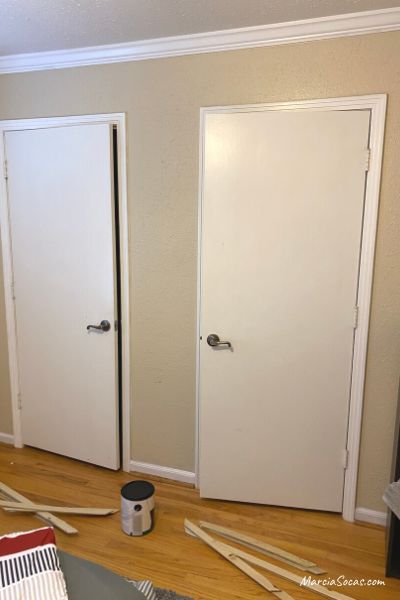
We started with very plain looking doors. They are slab doors. They had some scuff marks and minor damage in some areas. There were nail holes but no large holes or anything like that. Some might ask why we didn’t just replace the doors. However, we were working on a budget and also a time constraint. These pre-hung doors were already in place, a perfect fit for their respective locations, and we were planning on working on every interior single door so it would have taken a lot of work and time and money to change them all. This method of upgrading the doors to look like shaker panel doors was made much quicker and easier by using the existing door slabs. And certainly less expensive than buying a true panel shaker door for each door unit. We did not install new handles, as ours were in good shape.
Shaker Door Inspired
Although I’m referring to my doors as being a 2 panel shaker door, I should explain what the shaker style refers to. A shaker door features clean lines, square corners, and a simple style. Traditionally, when you look at a shaker door, this classic design features a flat panel with the raised wood panel along the outside. My 2 panel shaker door project actually uses the raised wood to create the clean modern lines on the door panel itself. Almost like actually being a reverse 2 panel shaker door.
This proved to be a much easier way to invoke the shaker style look without the more difficult wood work it would take to create a wood border all along the outside of the door as you might find with more traditional shaker doors. I love that this method of updating the door gives the same simple uncluttered style, and it can work just as easily on a double door. And I don’t have to worry about messing with the door handle.
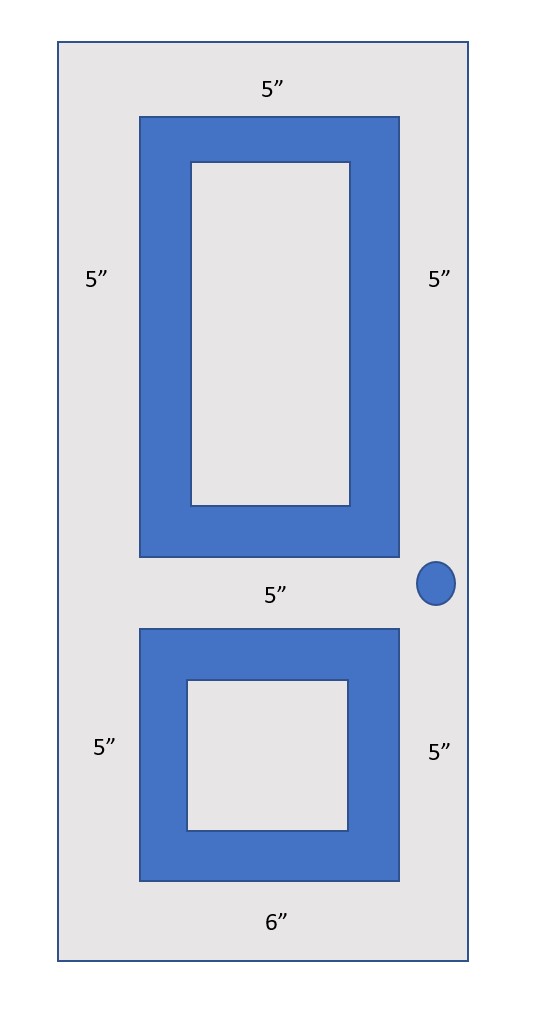
On the left, below, you’ll see what I’d refer to as a traditional 2 panel shaker door, with the gray part being the “raised” part. Creating a door like that would involve fiddling with the area around the door handle and also raising the panel around the top, bottom, and sides of the door; potentially causing issues with closure of the door.
On the right, you’ll see the modified 2 panel shaker door style used for the closet door makeover. The only pieces added were the sections in blue. Once the door is painted a solid color, the feeling of the clean shaker style is there, with only a fraction of the work.
Molding Placement for Closet Door Makeover
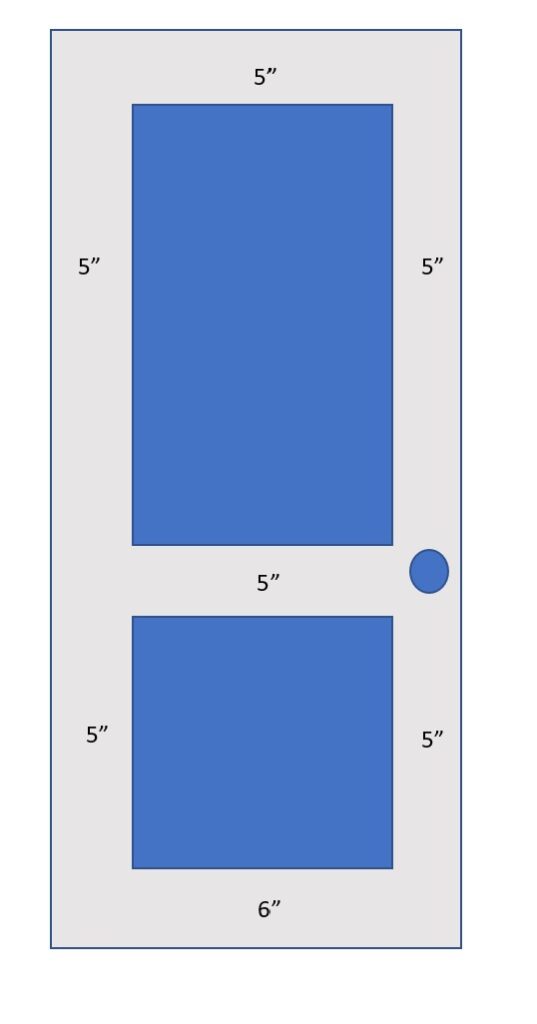
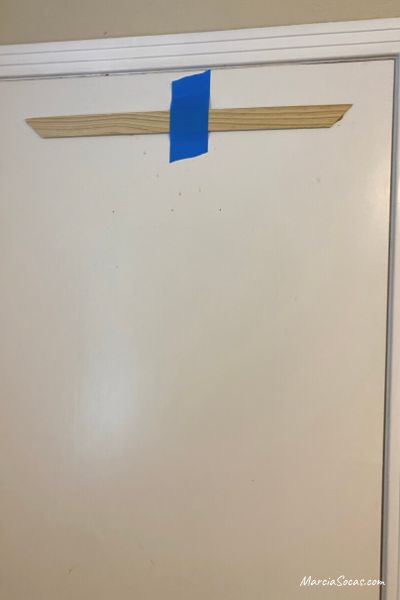
As a first step, I scoured the internet searching for the proper placement and measurement of the wood accent on flat panel doors. I wanted to make sure I had the wood pieces in the right position on the flat panels. Avoiding interfering with the door handle operation was important too. Opinions vary a little bit, but the general consensus I saw was to start 5″ from the top; and to leave 6″ from the bottom of the door. In order to keep a visually pleasing look, it worked to also place them 5″ in from each side. Additionally, maintain approximately 5″ in between the two panel sections. The diagram here shows it a little more clearly. You may make some adjustments based on your door size.
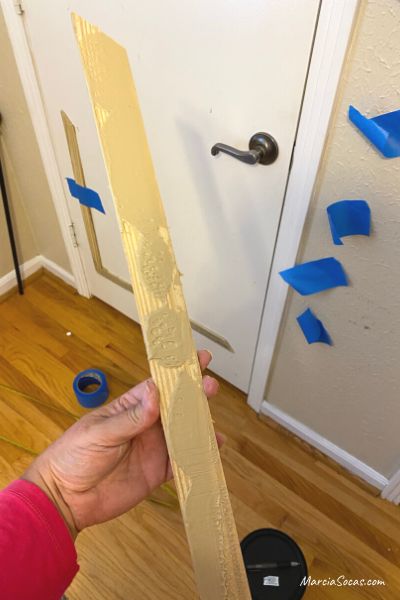
Purchase wood to create the raised panels on the door. The specific product I purchased was 1/4 in. x 1-1/2 in. x 6 ft. Pressure Treated Pine Lath from Home Depot. Your local hardware store should have something similar. It was cheap! (under $2 per piece) I found it in the fencing section of the hardware store. Looking back, I would have used a wider piece to give more of a shaker style. The pieces I used were a bit thin, but we did end up really happy with our result anyways.
Cut the wood
I measured the first piece and cut it with a 45 degree angle at each end using a circular saw. You could also use a miter box to make this easier.
Place Molding onto Door
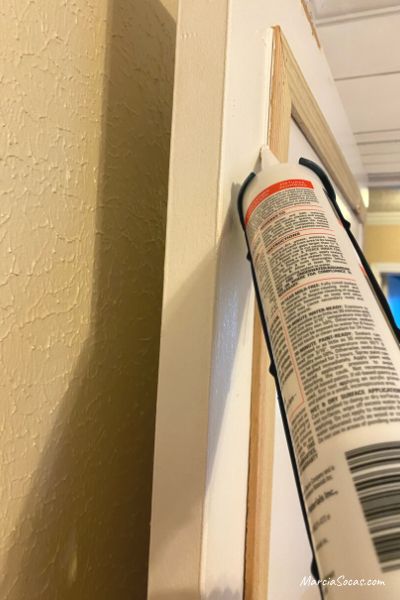
Place it onto the door using liquid nails, and secure with painter’s tape until it dries. (It’s a great idea to use a level to make sure you start with a straight line). Full disclosure, I did actually try using a nail gun at first, thinking it would be the easiest way to get the wood onto the door panels. However, the nails didn’t hold in the hollow core door and the nail heads actually poked through to the other side. The whole thing was a disaster, so I do recommend using liquid nails instead.
This is how much liquid nails I applied to the back of the “sticks”. You can see they’re kind of like thin plywood trim pieces. You could also use wood glue if you prefer.
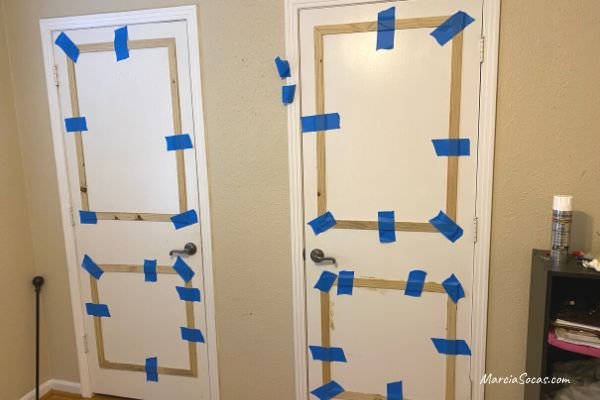
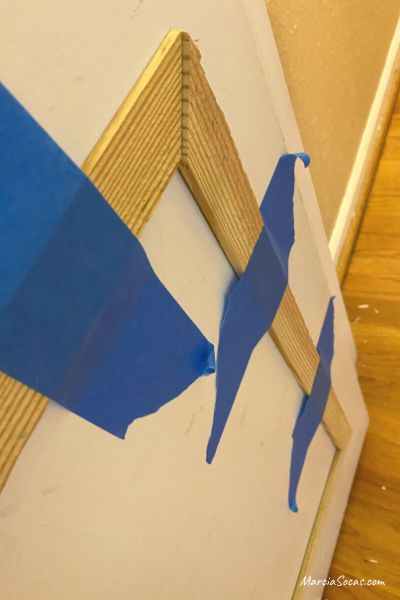
Continue placing your pieces together. The vertical strips and horizontal pieces will come together at their 45 degree angles. The corners should match up well but don’t worry about them fitting together perfectly, some small gaps are ok and we will deal with them later (I did not use wood filler).
Here’s how the doors looked with the molding panels installed and taped. Take a little break while they dry.
Fill Gaps
When you take a closer look at the wood against the door, you’ll see there are some gaps. The wood is pretty cheap and isn’t perfectly adhered to the door.
In order to give the door a better finish, I used paintable silicone caulk to seal the gaps. Make sure the product you buy is the paintable kind! The exact one I purchased is: GE Paintable Silicone Supreme 9.5 oz. White Kitchen and Bath Caulk
Let that dry for a bit.
Paint. The Closet Door Makeover is Coming Together Now
Now apply your first coat of paint. The paint color we chose was black. I had been seeing the black doors on a lot of closet door ideas on Pinterest. The dark color made a huge difference in making plain doors look more elegant. You can select a different color of course. Choose the paint that gives the look of your closet doors the feel you want for your bedroom decor. By the way, the use of chalkboard paint inside the shaker panel section could be really useful–I may actually do that as a future project in my daughter’s room so that she can write in there as a calendar or bulletin board. When painting, don’t use a heavy hand or you’ll get drips. Just skim the surface and leave it. You’ll need to apply a few different coats for it to turn out beautifully.
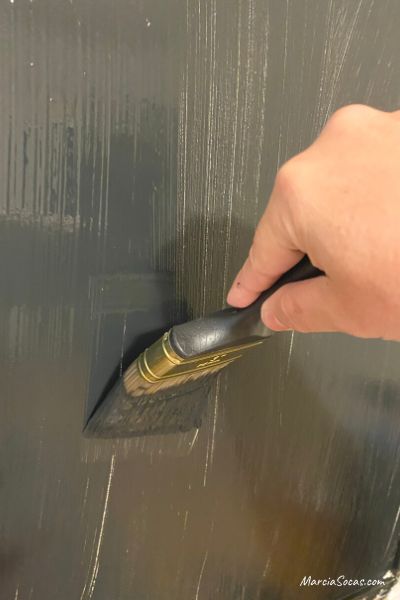
I know, all these drying steps take time, but it’s worth it.
Progress on our job site…
Patience, this way we have no drips when we’re done.
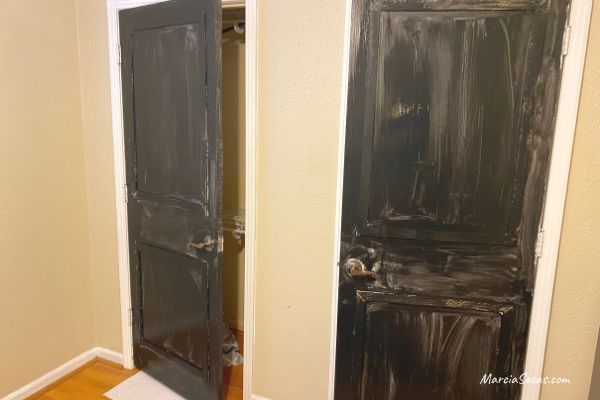
By the time you add your second and third coats of paint (it may take until the next day), it’ll look beautiful! So much more elegant and finished. It really looked great in our olde Alabama room (the 1831 room since that’s the year the University of Alabama was founded).
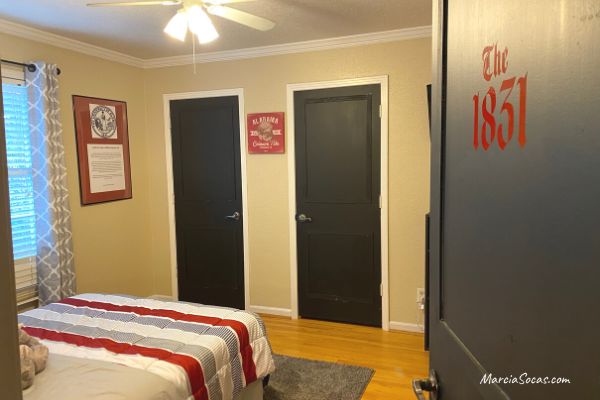
This fit our Alabama Airbnb’s housing decor perfectly and gave the necessary finishing touch to the room. The use of the black paint had a big impact on the rest of the room. It proved to be a simple way to make the entire room look more elegant. I hope you like the finished look.
Please view the page for our entire Alabama Airbnb renovation project. Here you’ll view all of the diy projects that we undertook in creating this themed home. You’ll see before and after photos of the whole house.
I hope you enjoyed this interpretation of a 2 panel shaker door closet door makeover.
View other DIY tutorials and small projects by looking through my site’s project section, or please sign up to receive my monthly newsletter with projects and ideas.
Also, join me on Pinterest. I’m a huge fan of beautiful ideas for a home, and always looking for ways to incorporate them without spending a fortune.
Love how you decorated the house. What paint color did you use for the rec?
HI Val, Thank you! For the project I just used the Matte Black from the Walmart closeby.