
How to Install Cabinet Pulls
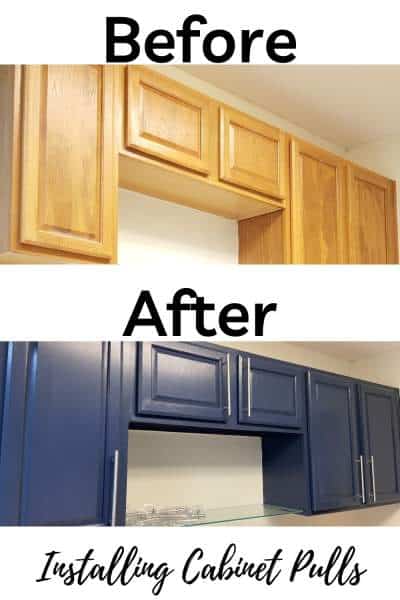
Adding kitchen cabinet pulls transformed the look and feel of this renovated condo. We flipped this condo in just two weeks, and saving time on the kitchen while making it look great was essential to our success. Avoid the mistakes I made when you install kitchen cabinet pulls.
Adding hardware can quickly change the look of a kitchen. Placing that hardware properly is vital. My first experience was filled with mistakes that you can avoid. I’d like to share with you how to do it properly.
After the photos of this blue kitchen project, I’ll provide a few pictures of how cabinets pulls transformed a white kitchen for us, as well as a photo of a home with “wrong” cabinet pull placement so you can see how that looks too.
Placement of the Cabinet Pulls
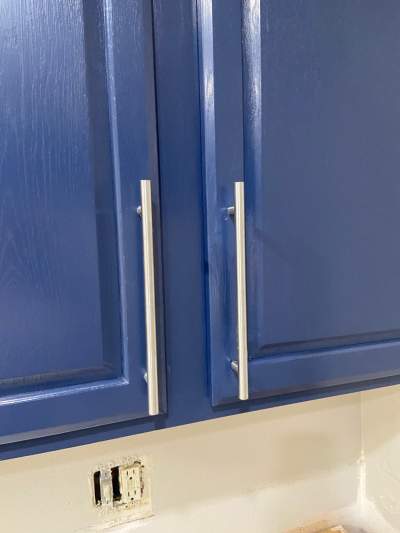
Where should cabinet pulls be placed? When placing your cabinet pulls, the ideal distance is 1″ to 4″ from the edge of the door. The exact distance is based on personal preference and what looks best for the size of the pulls you’re using.
Importantly, you want the pulls to be placed at the same spacing distance on all of the cabinet doors so that it will look uniform and professional. The best way to do this is by using a template for the installation of the pulls.
No cabinet pull installation project will go well without first understanding where the cabinet pulls should be placed so that they look right.
Is a Template Needed for Cabinet Pulls?
The template is essential for several reasons:
1. So that you’ll place the pulls at the correct distance from the door corner
2. To drill the holes at the proper distance for the screws–the pulls will require a screw at the top and at the bottom, you want to drill the holes for these properly
3. So that you’ll align the pull so that it’s not crooked from left to right–lining up the edge of the template along the cabinet door edge will keep your pull vertically straight.
You can purchase a template, or you can make one. If you’d like to purchase one, you can find one for under $10 (As an Amazon Associate, I earn from qualifying purchases)
How to Make a Template to Install Kitchen Cabinet Pulls
If you want to make your own template, or if you’re worried that the downloadable template I provide below won’t work because you have unique sized pulls, you can easily create your own.
Here are two ways to make your own template for cabinet pulls
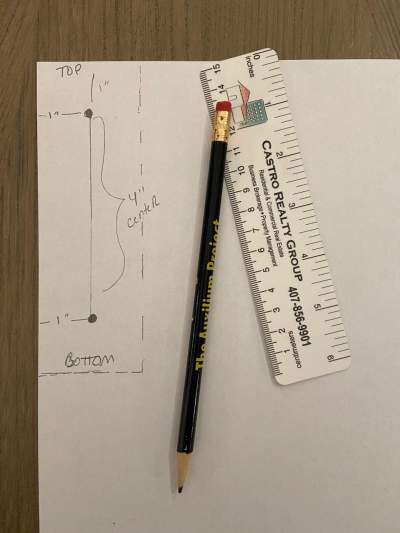
Hand Drawn cabinet pull template. Measure and draw your own–note, this is tricky because if you’re not perfectly straight you may end up unhappy.
- Get a piece of cardstock or firm paper.
- Determine the distance you want the pulls to be from the corner of the door front. Assuming that you want them to be 1″ from the corner, you can place a mark 1″ down and 1″ over from the corner of your page.
- Draw a vertical line down from your mark. Make sure it’s straight (use the edge of your page as a guide to make sure the distance stays uniform all the way down).
- Then you can measure down from your upper mark and place your lower handle marking.
Stamp your DIY cabinet pull template.
Another option which is quick and easy is to take your pull, mark it with paint (or whiteout) on the back drill holes. You can then “stamp” it onto a template page. If you use this method, make sure that your alignment is straight so that you don’t end up with a template that’s going to give you a bunch of crooked pulls. (I made that mistake myself the first time!)
Download Free Cabinet Pull Template
I’ve been through this a few times now, and I’d like to save you some time when you install kitchen cabinet pulls. I’ve created a printable document with common cabinet pull spacing sizes. You can download the template from my free resource library. Print it on heavy paper (like cardstock) and use it for your project then feel free to dispose of it and print out a new one on your next cabinet pull installation.
You can download the template in my free resource library. Just sign in with your email address to get the password and you’ll be able to enter the page with all of the downloads and project profit reports, etc. I’ve created a downloadable template for 3″ center to center pulls, 4″ center to center cabinet pulls, and 5″ center to center sized cabinet handles. The template also gives you the option to cut along a 1″ margin or a 2″ margin.
Click here to go to the library sign in page and download the template.
Drilling Holes for Cabinet Pulls
Let my mistake save you time and aggravation here. When I first installed pulls, I lined up my template along the smooth inside of the cabinet door and drilled out toward the front of the door. This was totally wrong. The drilling splintered the wood on the front surface of the cabinet! I was so disappointed and felt so foolish for not thinking that this could be an issue.
When you’re all lined up and ready to drill, drill from the outside of the cabinet to the inside, you’ll avoid the splintering that I dealt with (photo below)
By the way… This blue kitchen condo project had several parts to it aside from the cabinet pulls–here are links to all of them:
Measure Many Times Before Drilling
Line up your template, make small indentations, remove the template and make sure everything looks straight.
Put the pull up to the indentations you made, make sure the screw holes line up with your markings. Believe me, the time you take to ensure that everything is straight now is well worth it.
I tried to move too quickly and then I had to fix my mistakes. The good thing is that the mistakes are fixable!
Mistakes in Installing Cabinet Pulls
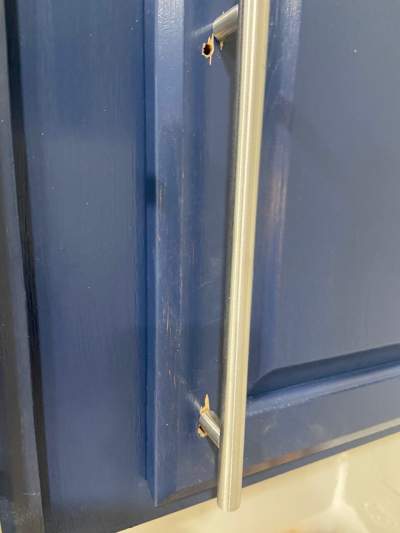
You can see that I made several mistakes above. As mentioned previously, I drilled from the inside of the cabinet to the outside, which led to splintering of the wood. I also didn’t line up the top and bottom screw holes properly, which meant that it didn’t connect and I had to drill another hole higher up and slightly to the right (because I was crooked too!).
Fixing Mistakes when Installing Cabinet Pulls
I was able to fix my mistakes by filling them, allowing it to dry and very very very lightly sanding it, filling it again, allowing it to dry, and then painting it. Here’s the material I used to fill the holes, it worked great:
Here’s how it looked when I filled the holes:
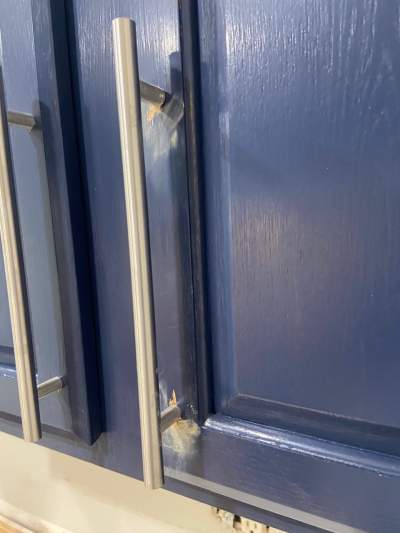
Here you can see how it looks just after touching up the paint. Once the paint dried, you couldn’t even see the mistakes!
Another less thought of mistake to avoid. It may seem silly, but make sure you cover the sink drain before starting. I dropped screws into the sink and down the drain TWICE! You really don’t want to put your hand into a strange drain in a house flipping project. Cover the drain, you’ll be happy you did.
Products used
5 inch Kitchen Cabinet Pulls
We used 5″ long pulls because I wanted them to be nice and long. Since there weren’t many cabinets, I felt that the longer handles would look best. We went with silver, although gold is very popular now and could provide a great look as well
Brushed Nickel Cabinet Bar Pull
If you’re looking for modern brushed nickel cabinet pulls, you can order ones similar to the ones in this condo. We’ve used this size and style several times (view a white renovated condo kitchen here) and it has been inexpensive and stylish.
How Much to Install Cabinet Pulls
Here’s a link to the 5 inch kitchen cabinet pulls we used. They were also inexpensive:
Here’s a link to other modern brushed nickel kitchen cabinet pulls that I really like. Some of these are nice square kitchen cabinet pulls:
Here’s a video of the transformation too!
How to Install Pulls on Kitchen Cabinets
- Decide on the placement from the door corner
- Buy or create your template (or download it here)
- Make sure you have you template labeled with top/bottom clearly marked
- Mark the cabinet door. Before drilling, make sure you are vertically aligned and that the spacing for the top/bottom screws is correct.
- Drill your holes from outside to inside (to avoid splintering the wood on the cabinet front)
Best Way to Install Kitchen Cabinet Pulls
After viewing the above tips, you should be ready to easily and properly install your cabinet pulls. Remember to keep your alignment and keep the pulls 1″-4″ from the cabinet corners. Here’s how it looks when you don’t!
Best cabinet pulls for white kitchen, best pulls for white kitchen
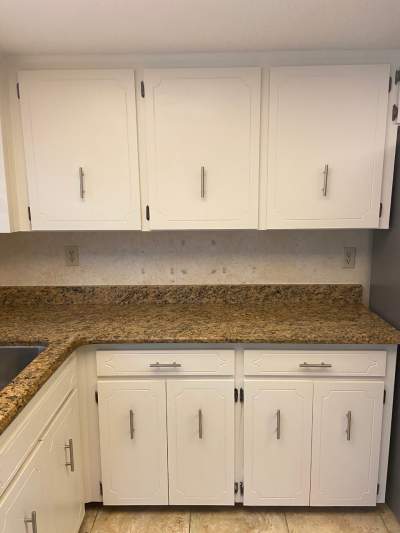
When you install kitchen cabinet pulls the right way, adding the pulls can make a plain kitchen look tailored and finished. Here’s a townhome we’ve renovated to flip. These photos show the difference that the pulls make on a white kitchen. (You can view this townhouse renovation and also see the income and expense report on that unit if you’re interested)
Before cabinet pulls:
After. The pulls just make the kitchen look more complete and detailed. They also make it more functional.
Tools to help you Install Kitchen Cabinet Pulls:
Drill
Drill bit, I used 3/16″
Measuring tape
I used a great 61 piece Pink Toolkit perfect for me, that came with the drill, drill bits, measuring tape, and more.
Template: make your own by drawing or stamping, download the free template, or purchase one like this.
Knobs or Pulls like these 5 inch cabinet pulls that we used
If you’re renovating a home, download my Property Renovation Organizer to help you keep track of your costs, contacts, and to-do lists.
Here are some other DIY renovation projects and home flipping posts that you may enjoy:
I saved up for 8 years to get custom made cabinets and since it had thick molding around the doors the grab knob or pull were told to had to go on the panel part of cabinet…I looked everywhere and see no pictures like this so told cabinet builder this…he told me this was where they go and other people didnt know what they were saying about being place wrong…I went and paid him but still don’t see any cabinets with this…10,000 dollars to me was a lot of money..I am 62 and live in mobile home but wanted a nice kitchen to maybe for cooking videos for money since i am disable…always wanted a dream kitcken but now its driving me crazy…is he right that’s the way they do it…if not I guess I need to save to replace the doors…thanks
I’m sorry but the cabinet builder was wrong. All you needed was longer screws to put the handles wherever you wanted. You can follow the steps in the article above to fill in the holes, paint or stain, and move the grab knobs/pulls. This repair/change is something a basic handyman (or handywoman) can do for far less than 10,000… maybe a couple of hundred depending on how many cabinets you have and where you live. It can’t hurt to ask around for quotes. I am so sorry your cabinet builder did not listen to you and I wish you the best.