
I wanted to achieve a low budget bathroom remodel. The bathroom was approx 5×8 so it’s a small bathroom with a big impact. I hope that these low budget bathroom remodel ideas inspire you!
Throughout my site I provide affiliate links to products that I hope will help you with your DIY project supplies. As an Amazon Associate, I earn from qualifying purchases. This means that I may receive a small commission if you use these links to purchase products, but it does not change your price in any way.
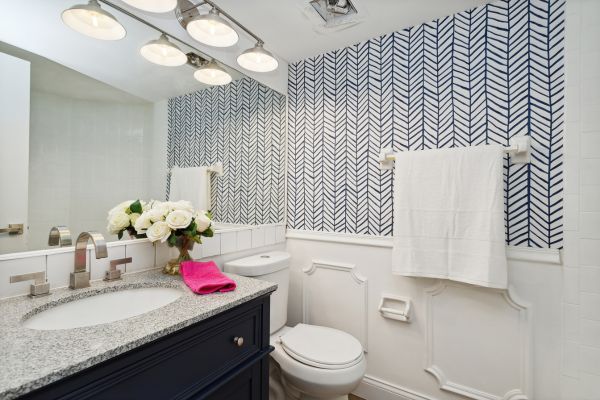
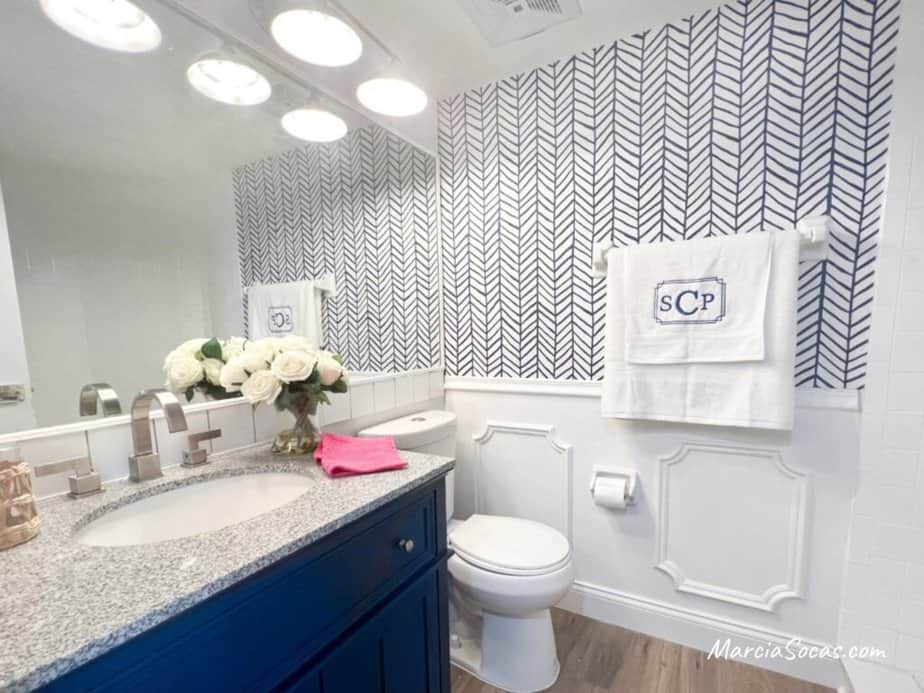
I worked on a few different projects in this bathroom including wallpaper, adding accent molding, a shiplap surround around the mirror, new lighting, and a new vanity.
You can view the products list here on Amazon.
And the Vanity is here.
How I transformed this small space in just one weekend and on a budget!
If you have a dark and dated bathroom that looks anything like this one then you may benefit from this weekend renovation.
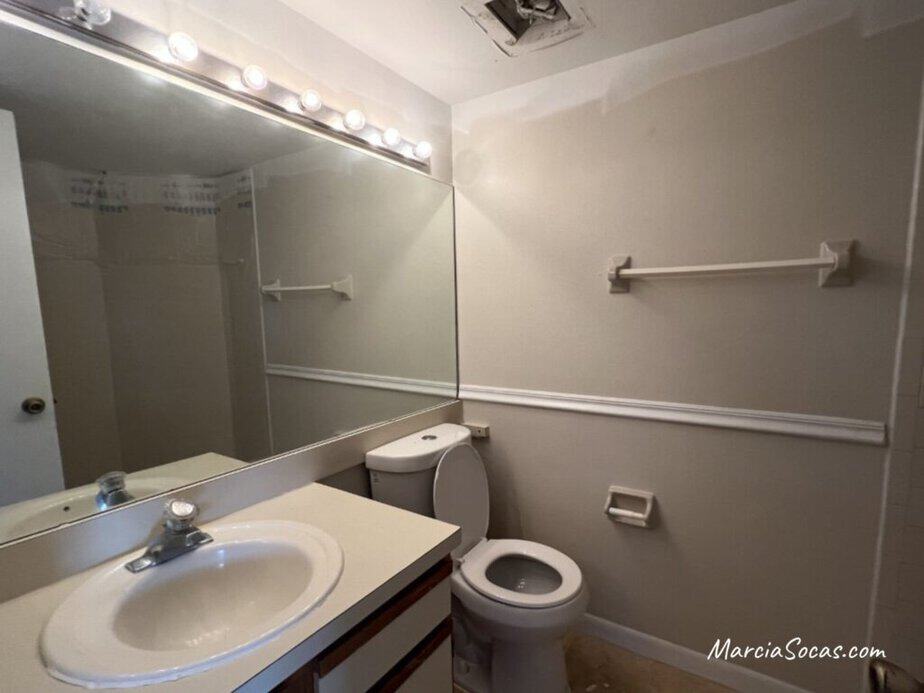
This hall bathroom was pretty small, maybe around 5×8 or so, including the shower in the bathroom layout.
I did most of the work myself, avoiding labor costs with DIY projects.
This condo remodel featured 9 DIY projects, you can view them all here.
The total cost of the full bathroom renovation was around $650 for me. I think that’s a great bathroom remodel cost and I was really happy with the results.
Here’s what I did:
Wallpaper:
in this bathroom, the first thing I did was to grab my favorite brightly colored wallpaper. it was a peel and stick version so it was easy for me to reposition it a few times to make sure that I had it straight and level.

This bathroom had no natural light at all, so using a bright wallpaper helped make the room feel lighter and even gave the illusion of more space.
I used a razor blade to cut a small X in the wallpaper to go over the towel rack holder then I used the razor blade to cut away more and more slowly so that I could get a great fit around it.
Some people don’t like the idea of using wallpaper in a wet room like a bathroom, but I’ve never had a problem with it. And if you’ve seen older homes with wallpaper, you know that stuff can handle the test of time!
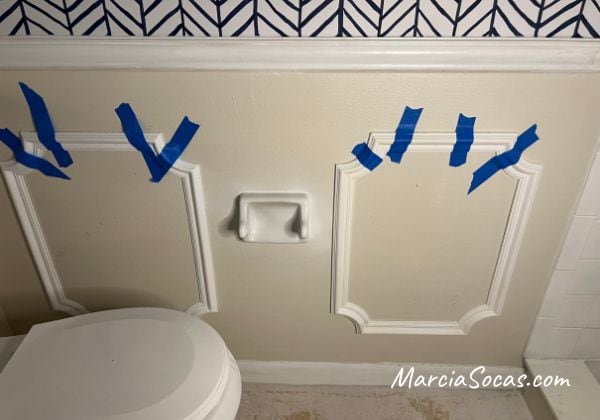
After my wallpaper was in place the next step was to add some interest to the lower wall.
Lower wall accent:
I grabbed some pre-made molding panels and measured my wall to make sure the molding pieces would be centered the way I wanted them to be I made sure they were level and then I taped them in place while I went to grab my nail gun.
I used a nail gun to secure them and then use caulking all the way around to seal the gap between the molding and the wall.
The next step was to paint it all white. It looked great against the wallpaper. I knew I didn’t want a fully white bathroom but having it here on the lower half of the wall went a long way to adding to the brightness of the entire room.
During that time I had my husband bring in a new blue vanity that I found on sale and secure that in place we also went ahead and installed some click and lock vinyl plank flooring.
Flooring
it only took about a box because it’s a small bathroom. The flooring I used is here, its around $50 for the box and covers around 24 square feet.
Installing new flooring using the click and lock vinyl plank flooring is really pretty easy and quick. I do have one flooring installation tutorial here for a bedroom I did in another condo.
Of course, you could also choose to paint your ceramic tile if you have a tile floor and want to save on the overall cost and like your tile pattern.
Speaking of tile, let’s discuss the shower stall
I did also paint the old tile in the shower-tub combo. I didn’t want to get into complicated bathroom remodeling and changing out the tile in the shower stall or installing a new tub. So, I painted the tile which was the easiest way to give it a fresh look. The wall tile was in great condition so that made the painting of the tile possible.
I did replace the shower head. You’ll be shocked at how easy that is. I have a short tutorial on that here. The fixture I used for my shower head was only $20 and it was a beautiful rainfall showerhead.
Now I had to deal with the mirror. It’s a large boring mirror but I didn’t want to spend money on a new one.
The mirror
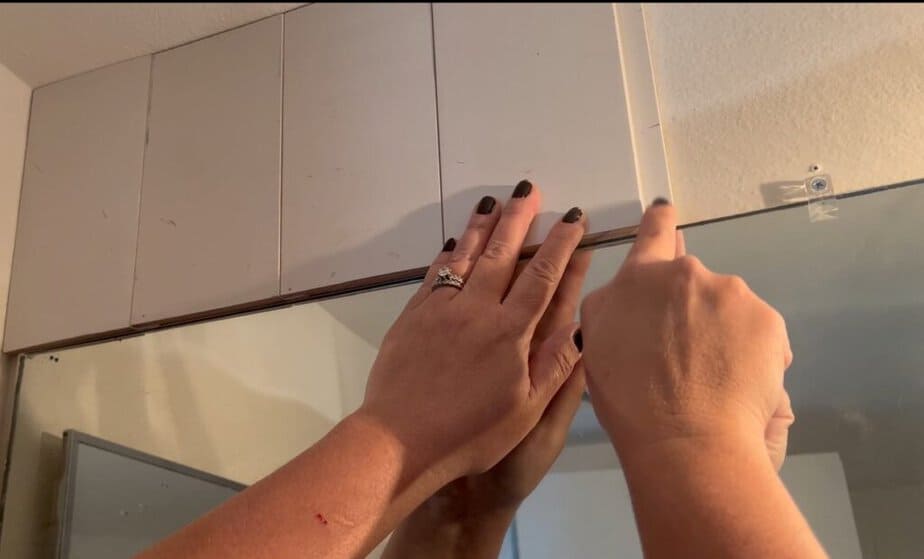
I thought I could trim it out and make it more interesting. I had some extra pieces of shiplap leftover from another project, and I wanted to be able to use them somehow in the bathroom.
The pieces were small so I could not use them in the traditional horizontal way. I decided to place them vertically along the top and bottom of the mirror I didn’t measure them with a measuring tape instead I measured them right in place so that I could make sure they’d fit snugly and securely against the mirror.

Use a nail gun again to secure these in place.
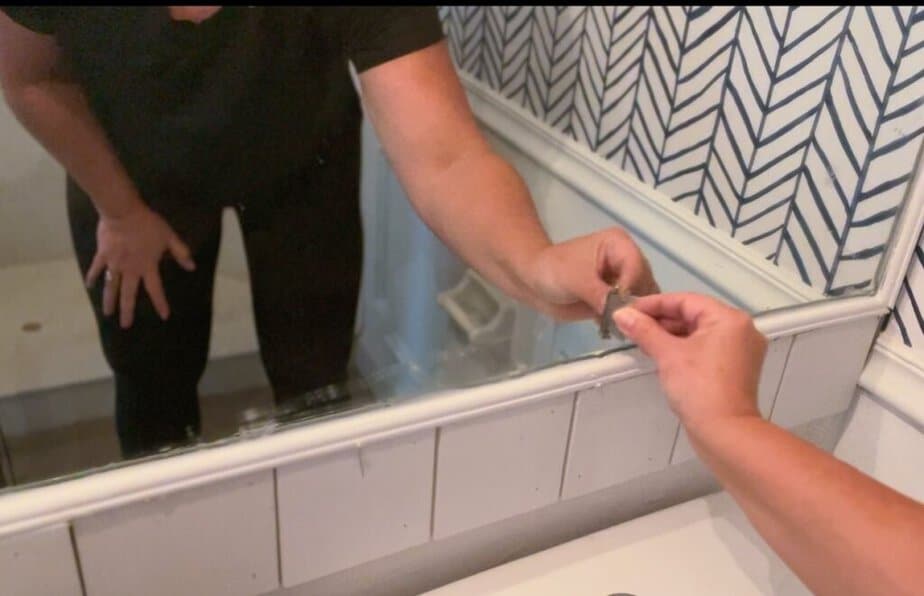
The key part came when I got to the mirror clips. As you can see they’re going to be completely in the way, but I realized that the mirror clip was smaller than the tongue part of the shiplap.
So I simply cut away a piece of the shiplap so that it would go around the mirror clip area. This way the mirror clip could fit and then the next piece just went right over top of it. Easy!
The light fixture extender
When got to the area where were the new light fixture would go, I needed to add an extender box that looks like this in order for the wiring to come out a bit more and for the new fixture to sit properly over the shiplap trim that I added.
I did have a handyman help me install the light, I don’t like to work with electricity just yet.
Finishing the mirror
Once I had the shiplap cut and secured along the top and bottom of the mirror, I then used a small piece of molding. To finish out the trim, again I had to deal with the mirror clips and this time I had to cut a notch in the molding so that it would sit flat against the mirror without the mirror clip bending it out of shape or making it look warped.
I used a tool called a multitool to simply cut out a small notch then it fit perfectly over the mirror clip. Use liquid adhesive to secure the molding to the mirror. I taped it all the way around until the glue could dry. Then I applied caulking all around the trim molding and also anywhere there was a gap in my shiplap that might need it.
Once this was dry then I was ready to paint my trim and shiplap. After those steps I used my flat razor blade once again this time to scrape off any paint glue or caulking that had gotten onto the mirror itself.
Light fixture
The new light fixture went up, hard to believe it only cost $40!
and then all I needed to do was add the modern new faucet that I purchased online for approx $50
I added some decorative touches to the bathroom bringing in a little bit of color with these pink hand towels I also added a fluffy bath towel and a towel which I embroidered with the initials for the name of this condo flip I’m working on and it was done I hope you love the way it turned out just as much as I did the cost on this project for me was approximately $650
Medicine cabinet and towel bar
The medicine cabinet was fine, so I didn’t change it.
If you take a look at the towel bar, you’ll see that it was originally almond color and then it’s white at the end. I just used the tile spray paint for that!
Vanity
While some might prefer a pedestal sink if they’re working with a powder room or other tiny bathroom, I wanted to have a fully vanity. This way there was enough space in this hall bath to store items and a great way to make it truly functional. I didn’t just want to make the space feel bigger by taking less space on the vanity.
This 32″ vanity was on sale for $359 and I love the Navy color. Here’s a link to it, hopefully it’s still on sale.
Bathroom fixtures
I love the look of the faucet that I purchased. To me, it’s another focal point on this corner sink and vanity. You won’t believe the price range for it. it was only
Plumbing fixtures can truly cost less than you think and provide easy ways to make an impact without adding too much to the bathroom renovation cost.
I definitely think that the expense was well worth the change this bathroom underwent.
The average cost for a small bathroom remodel, according to Bob Vila, is $10.978. I was able to DIY this bathroom for so very much less!
Here are my bathroom costs:
Accent pieces for bottom wall $40
Shiplap (free)
Tile paint (for shower and towel rack) $50
I hope that you have a great time with your small bathroom renovation. No matter the size of your bathroom, make use of your square footage and make it a place you love and that makes you happy.
By the way, I also took on a full renovation and various DIY projects in the master bathroom in this condo. If you’d like to view that main bathroom and renovation project costs there, please check it out here. My favorite project in that bathroom was creating an accent wall behind the toilet with the look of wood through the use of leftover flooring.
Beautiful job with this “reno”…I LOVE the use of the shiplap done vertically rather than in traditional horizontal format as it creates a more interesting effect. Also LOVE the POP of navy blue in the vanity….
I love it!!