

How This Townhouse Renovation and Flip Started
“There are some things about money and some career options you just don’t learn about in school.“
This is the topic of a conversation I had with some of my girl friends lately. We all have kids in middle school and high school (and a couple in college and beyond) and its interesting to see the paths the kids take and how little they’re exposed to before they’re told to decide on the careers and courses of study that will determine the rest of their lives.
For me, my first career path was actually Neuroscience. Really! I wanted to go into medicine and started working in a lab and doing research. From there I waitlisted for medical school but I was accepted to graduate school and offered a stipend. So there I went, into graduate school and pursuing my PhD in Neuroscience. Clearly I didn’t continue down that path, you can see my life story in my bio if you want to know more.
Going into real estate was wonderful for me. I’ve learned how to invest, how to make passive income, and how to fix and flip homes. I wanted to expose my friends’ kids to this alternative career path, and I was so happy that they were willing to give it a shot, give their time, and learn to do some townhouse renovation projects!
You’ll be amazed at what the kids did over two days of work! Take a look at the projects below and know that you can do it too!
(I’ve included some product links where applicable in the hopes they can be of help in helping you with low cost great looking products. As an Amazon associate I earn from qualifying purchases)
The Projects
Click on the Images Below to view the Before and After photos in these rooms, and get links to the products and the “how to’s” for these projects.


The Products:
If you’d like to see the low cost items I used in the kitchen (fixtures, cabinet pulls), the lighting that I like to use due to it being budget conscious and great looking, wallpaper ideas, and the other “go to” items I use on a house flip, you can see them on my Amazon page where I have them all stored in lists so that I can find them quickly and share them with people looking for renovation help.
Watch the Video, from Start to Sale, including the negotiations and the profit made:
Wallpapering an Entryway in the Townhouse Renovation
Before and after photos of the townhouse interior wallpapered entryway


I love the before and after of that entry hallway. Entering the ground floor of this townhouse looked so dark. This area leads to the living room and dining room. The lack of natural light was oppressive. Brightening this up in the townhouse renovation project without new walls or structural changes was an interior design challenge.
Wallpaper was essential in this stunning transformation. The difference in the photos shows how some simple and inexpensive townhouse renovation projects can be. One looks so off-putting and the after photo is so inviting!
This townhouse entryway was dark and the drywall was splotchy with paint and not smooth. Adding this peel and stick wallpaper helped us lighten up and transform the space.
You can view all of the details on this part of the project and see the video tutorial on installing peel and stick wallpaper at an entryway here.
Creating an Accent Wall
Before and After Photos of the Accent Wall and Study Nook in the townhouse interior
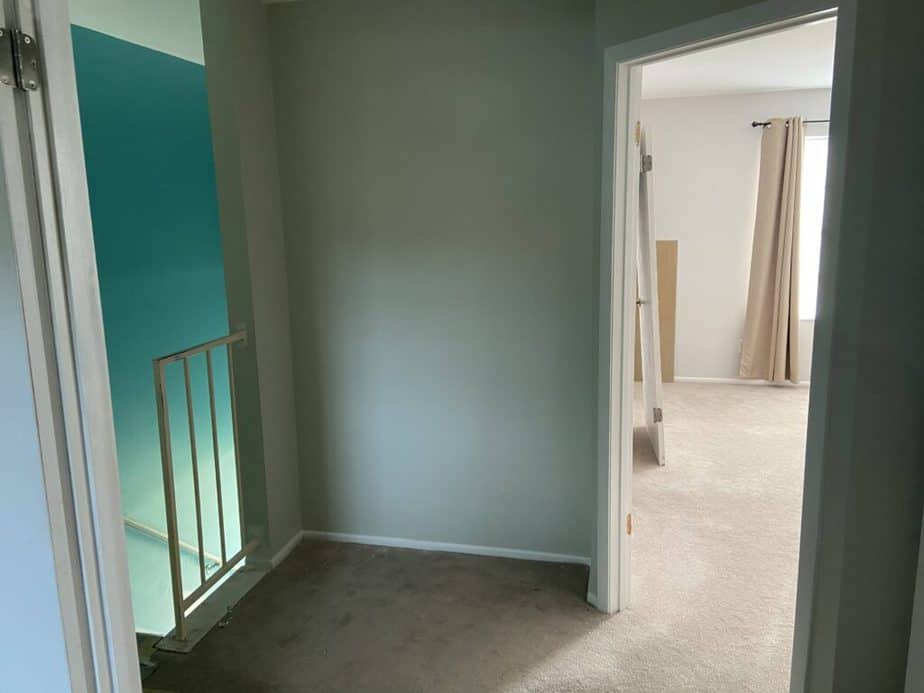
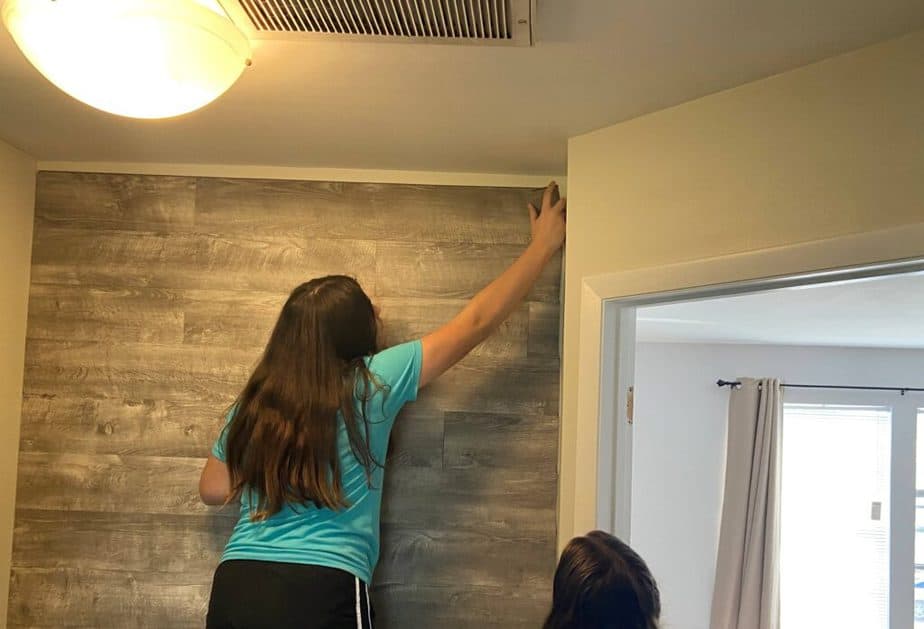
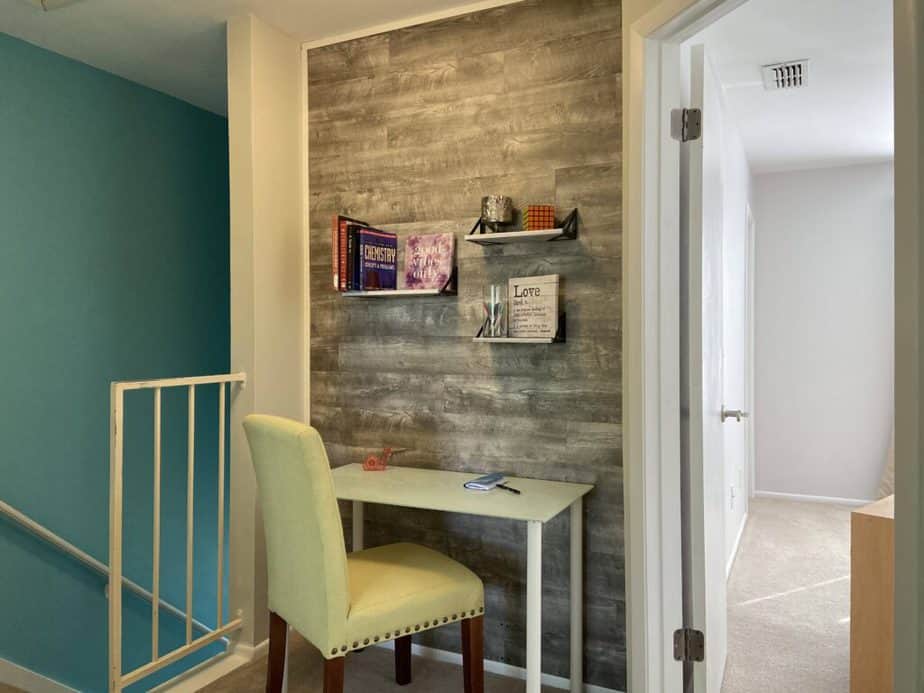
This accent wall was created at a small landing and unused space at the top of the stairs. This second floor landing provided a perfect study spot and accent wall. The teen girls used leftover vinyl plank from another project to create this space. Cost was minimal, and they completed the project in just a few hours.
This inexpensive floating shelving completed the look and then we staged it with some dollar store items and an IKEA desk.
View the accent wall walkthough and project info if you’d like to do this yourself or want more details on how it was done.
Townhouse Kitchen Renovation
Before and After photos of the kitchen renovation in the townhouse interior
Before:


After:


For the townhouse kitchen renovation, we installed a glass tile backsplash and we also added cabinet pulls, and I’ve created two separate tutorials for those which you can view by using the highlighted text above.
There was a large gap between the two cabinets around the sink. These were an odd size so we couldn’t add a cabinet here. We chose to add open shelving to solve the problem.
Adding open shelving helped us to resolve the problem and bring an element of modern kitchen design into the townhouse.
Upgrading the faucet also made a huge difference, and for far less than anyone would have thought. It looks like a new kitchen!
Staging Open Shelving in a Kitchen Renovation
You see it on all of the Home Renovation shows lately, open shelving in the kitchen. Is it practical? Is it possible for it stay neat?
In this townhouse renovation we just added one small section of open shelving. We really just added two pieces shelving from Home Depot that we cut down to size. Then we screwed them in from the cabinet sides. That’s it!
This allowed us to create “custom” shelving for a space that was really difficult to fit with standard cabinets and trim.
So how about staging this area for sale? We wanted it to look inviting and so we used some tried and true design tricks. You can view those and see a time lapse video on that shelving in this Staging Open Shelving post.
Here are the before and after photos of that space:

See that weird gap? Standard sized cabinets wouldn’t fit, and then we’d have had to worry about putting trim pieces and then making sure that was symmetrical. I think it would have looked weird trying to get cabinetry in there and adding the shelving did the trick!


Installing Click and Lock Flooring in the Townhouse Renovation
Before and after photos of click and lock flooring in the townhouse renovation
Before:
As you can see, the vinyl plank flooring was an easy click and lock system. It was installed directly over the existing tile, as it is a floating floor system.
It totally transformed the look of the dining area and living space.
After photos of flooring:


Changing the flooring was an immediate upgrade to the townhouse, and it was completed in just a weekend.
If you’d like to view a tutorial of how the click and lock flooring comes together, just check out this Click and Lock Flooring tutorial.
Negotiating the Sale of the Townhouse Renovation Flip
Every property has it’s own story and it’s own negotiations and this one got us with a bit of a surprise. We knew we needed to install a new roof, we knew we had cosmetic work to do. We didn’t know there was polybutylene plumbing in the unit. This came out when the buyer did their inspection (we didn’t have a formal inspection done when we bought it).
In the video of the renovation I talk a little about those negotiations, but basically we ended up giving the buyers a credit so that they could have the property repiped in the future. We also gave them a credit for a new water heater when we found out the current one was from 1985!
How Much Money is Made in a Townhouse Flip
So, how much money did we make from this townhouse purchase and the renovation process? This is usually the question everyone wants to know the answer to. After expenses, closing costs, etc, we ended up making approximately $20,000 on this property. Pretty awesome!
If you’re starting your own flip and you’d like a free downloadable excel spreadsheet to keep your renovation budget on excel, just head to my free resource library and you can download it there. You’ll be asked to sign up for our mailing list and given the password so you can access all of the free downloadables.
Additional Townhouse Renovation Projects Not Included Here
Renovations were also made to the master bedroom and secondary bedroom on the second floor of the townhouse. Not much is written about them because the remodel here was minimal. The carpet flooring was in good condition, so it didn’t need new flooring. The paint had already been redone on the existing walls by the prior townhouse owners as part of the renovation project they started but never completed.
We installed new lighting in the master bedroom, and then basically just needed to stage the bedrooms and bathrooms to make them look like an interior designer had breezed on through!
Since we made no major structural change (we almost never do), we avoided the need for a general contractor and stuck with DIYs in this remodeling project.
Good luck on your townhouse renovation search! I hope you can find a townhouse with great square footage, good bones, no red flags,and fantastic livable space. Use the ideas in these projects and give your townhouse remodel your own modern or vintage style. Remember that learning what you can about the building’s history, especially in older homes, may help you avoid surprises like the one we ran into with the polybutylene plumbing! If you have teens or kids, hopefully you can undertake some of these townhouse projects with your own family. The end result will be a great experience and hopefully a beautiful townhouse renovation.

Let’s make something beautiful together.
Let’s get Social!
Join me on Instagram:
And I hope my Pinterest boards will inspire you: