
This project covers how to install backsplash using adhesive tile mat backing.
Recently, I worked on a townhouse flip where I mentored a group of teens. They gave me two days of their time, and they learned several projects involved in flipping a property.
It was a great experience for everyone, and if you’d like to see the whole project and the profit made, you can view that here: Townhouse Renovation.
Since the projects needed to be simple and not overly time consuming, but we also needed the place to look great and be well done, we spent a little extra money and saved a lot of time when we chose to install backsplash using adhesive tile mat rolls. This way we didn’t need to use any thin-set adhesive at all.
Eliminating the use of traditional thin-set mortar meant that we didn’t have to undertake the mixing and dry time of thin-set mortar. Using self adhesive tile mats also results in less mess for sure. After trying it on this project, I definitely prefer it over traditional methods.
Note: This post is not sponsored by any company or product. I have included affiliate links to products in an attempt to help you find the products you need. As an Amazon associate, I earn from qualifying purchases.
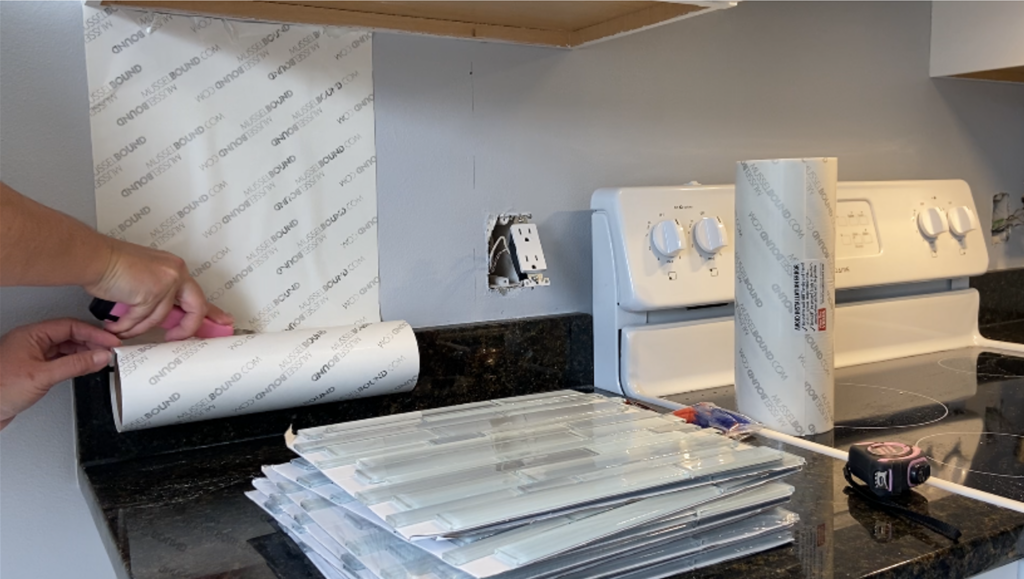
Here’s a look at the product we used, Musselbound Adhesive Tile Mat:
The adhesive tile mat we used worked really well, but there is a similar product you can buy at Home Depot or Lowes. Here’s a link to some other adhesive tile mats.
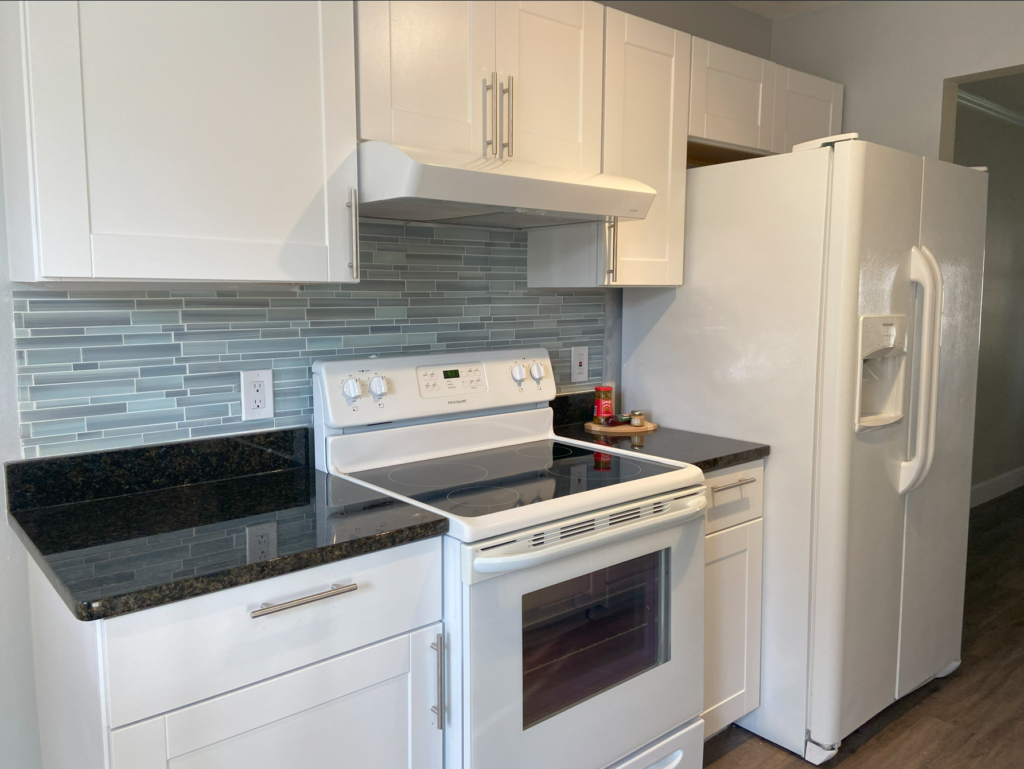
Here’s how the kitchen looks before we install backsplash using adhesive tile mat and the blue glass tile backsplash:


Below are the easy steps involved in adding tile backsplash using an adhesive mat backing
Before you start: Gather your supplies.
I’ve put together a downloadable cheat sheet with this supplies list and a recap of the steps. You can print this out and have it handy when you’re ready to start. You can access the free printable download at the Resource Library of my site. Once you sign in you’ll also be able to download all of the other projects, the renovation budget worksheet, home buying and selling booklets, and other templates I have stored there.
Supplies
- Adhesive Tile Mat
- Tools: Razor / Utility Knife, Level, Screwdriver (for removing outlet covers), tape measure
- Sniffer (to make sure electricity is off)
- Your Favorite Tile–I recommend the kind that come on a 12 x 12 mesh sheet because this is much easier to learn with than trying to place and level individual tiles.
- Sharpie and/or Pencil
- Wet Saw
- Grout
- Rubber Grout Float
- Gloves
- Sponge
Take your “before” pictures.
I’ve already posted mine above for you. I wish I’d of taken more, so always take more than you think you need and take them from different angles because you don’t know what part of the kitchen you’re going to like best at the end. Once you install backsplash using adhesive tile mat in your kitchen, you’ll be happy if you have a good before and after comparison of from different angles.
Calculate the size of your backsplash work area
In order to purchase the correct amount of adhesive sheet and wall tiles (usually sold per square foot), calculate the area of your new kitchen backsplash. To do this, measure the distance from the kitchen countertop to the bottom of the cabinets. Let’s say, for example this is 24 inches. Then measure the length of the backsplash wall area. For example, 120 inches. Multiply these (24 x 120=2880) and then divide by 144 to convert those square inches to square feet. 2880/144= 20 sq ft in the example above. Add a little bit for overage loss due to tile cuts, and I’d probably buy around 24 square feet of tile in this example.
Determine your starting point
My tip is to start at the corner wall if there is one. If you start at the wall then your ending point is a little easier because it can vary a little but. If you start at the open end and try to end at the wall, then you have to be more precise in your cuts at that point.
In this part of the kitchen, there was no wall end, so I started at the open end so that I could end on the refrigerator side. Ending here would cover up any little mistakes better than having ended at the spot you see right when you walk into the kitchen.
That picture above should be Pin-able in case you want to save it to a Pinterest board for later.
Remove the electrical outlet covers, turn off the breaker (just in case)
When you install backsplash using adhesive tile mat, you’ll need to remove the outlet covers and please turn off the breaker and check with an electrical sniffer to make sure there’s no electricity still running to the area.
After all, you’ll be working with a wet sponge in that area at the end, and it’s better to make sure you’re doing things safely from the start so that you don’t forget to turn it off later.
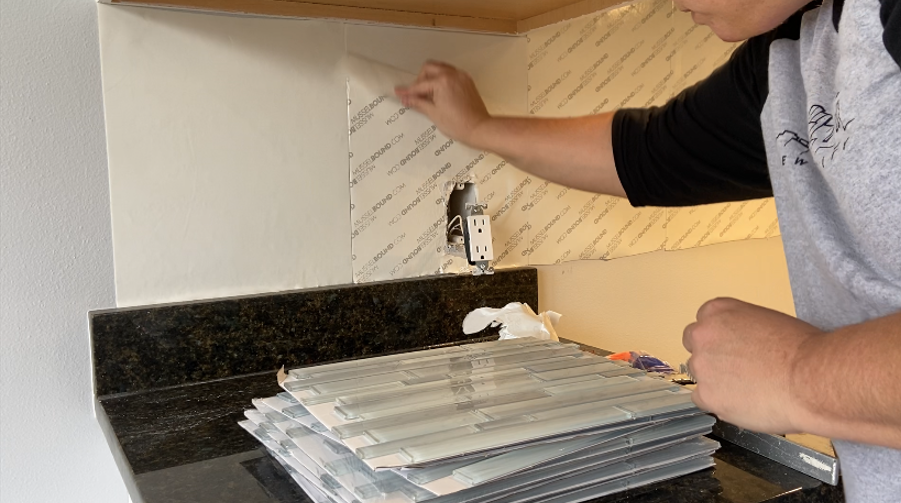
Press the adhesive to the wall. Start at the top and let gravity help you.

You can see above how to start at the top, meaning that you start immediately under the cabinet. Let the roll of adhesive hang down and press it lightly (not firmly) to the wall at this point.
Start Straight
Place a level along the left and right sides of the adhesive backing that you just placed on the wall. Make sure that it is straight, because once you start, the other pieces will line up against this one. Starting straight makes things much easier.
Note: In the photo above, you’ll see that my tile adhesive backing has a wrinkle in it. Do not allow wrinkles in yours. I had to go back and fix this piece because the tile did not lay down well over it. Save yourself the trouble and learn from my mistake.
Place the next piece up against the first. Don’t overlap and don’t leave a gap
You’ll place the next strip of adhesive tile mat right up against the first one. Don’t leave gaps since you want a continuous surface for your tile to adhere to.
Cut around any openings (like the electrical outlets) or cabinets

Above you can see how I cut out the tile mat around the outlet. I used the razor tool in the pink toolbag set that John gave me as a Christmas gift (which I love). You’ll also see that as I continue along, I continue to make sure that everything is straight. I used this triangle ruler to also cut a level surface along the bottom. I made it level with the existing backsplash.
Normally, if you’re renovating a kitchen, you wouldn’t even have this existing backsplash coming up from the counter. It gives you a cleaner look without it. However, we were working with what we had and it really looked nice with it at the end.
I leveled the backsplash with the granite backsplash border and it was ultimately covered by the range.

Above you can also see how I cut the adhesive around the cabinet. For that, I just used scissors rather than the razor because I didn’t want to take a chance of cutting the cabinet with the razor.
The adhesive tile mat was very easy to cut.
Press down on the adhesive mat
Once everything is in place, and you have removed any overlap, air bubbles, or wrinkles, press down firmly on your adhesive tile mat to make sure that it’s secure and has a good bond.
Get your tile ready. Line up the pieces in the correct orientation

This step is a real time saver and keeps you from making mistakes that you have to correct by repositioning the tile.
The staggered glass tile I was using fits together so nicely when you line up the pieces. But you need to make sure that you use the same orientation so that the pieces fit together and so that your edges line up properly at the end.
Above you can see that the tile at the bottom has a long piece and then a shorter piece. If you line up all of your sheets of tile this way, you can quickly grab the tile for the installation without having to try to figure out if you have the tile oriented the right way.
A note about tile choice:
We used mosaic tile. What is mosaic tile? Mosaic tiles are the type that comes on a sheet. Mosaics can be made of glass, pebbles, stone, porcelain, and more. The reason I like mosaic is that the sheet backing makes it easy to cut as needed.
If using other tiles, be sure that they’re not too heavy, as I’ve seen some issues reported online with the use of heavy tiles. If you’d like to use a larger or heavier tile, please see my upcoming tutorial on a large colorful Spanish Tile outdoor accent wall I created with big ceramic tiles, and consider using those supplies instead. Just sign up for my newsletter and you’ll be notified when that tutorial comes out.
Peel off the protective cover from the front. Peel off 2, not just one.
The adhesive tile mat protective liner just peels right off. Super easy. Make sure to remove a couple of rows and expose the adhesive. If you peel off just one strip then your tile will go over onto the second strip of adhesive mat and then you’ll have to fiddle with it to get the covering off.
Note: remember the wrinkle I had in one of the earlier steps. Note that I’ve completely fixed that issue before starting to press on the tile.
Press the tile on to the adhesive mat. Start from the bottom
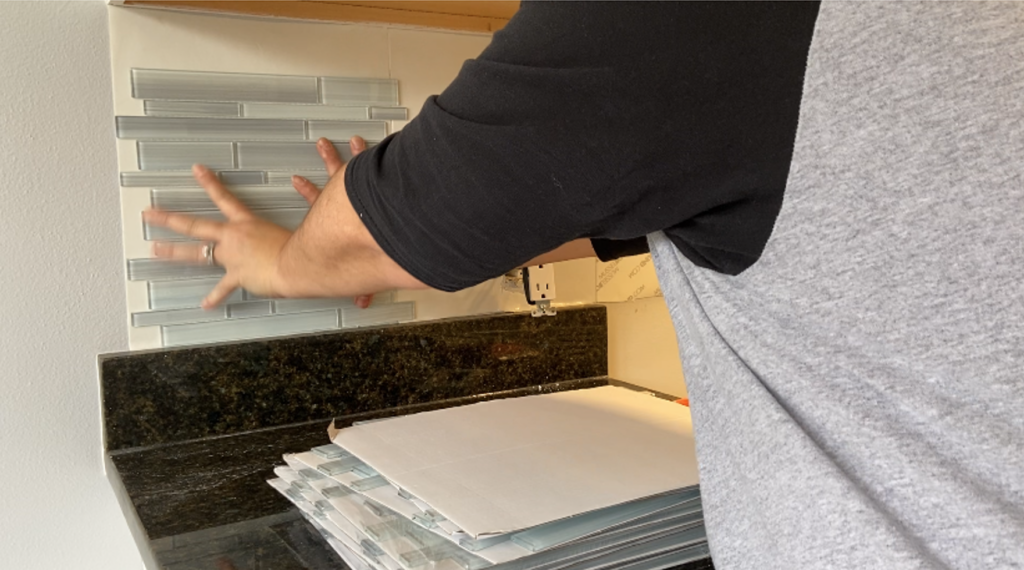
Whereas you positioned the tile backing starting from the top of the area to be tiled, you will start installing your tile backsplash tiles from the bottom.
Why the change? Well, you start installing the glass tile from the bottom because when you get to the top, it won’t fit perfectly. In order to get the tile to finish perfectly at the top, you might have to actually cut some tiles lengthwise.
That would be very time consuming and difficult. If you start your tile backsplash installation at the bottom, then you can cut the tile sheet mesh at a natural break. It won’t look weird because you don’t really see the area under the cabinet when you’re standing in the kitchen. Also you can have grout spacing here to complete the backsplash.
I’ll show you a picture down below that might highlight this better.
When you’re happy with the tile placement, press it down to form a strong bond.
Check it with your level.

Making sure everything is level becomes even more important now. Since the staggered mosaic glass tiles fit together in a pattern you need to start level so that it will continue that way along the length of the kitchen.
Depending on the type of tile you’re using, you may also want to use tile spacers to get nice and evenly spaced grout lines. I felt comfortable using the level and fitting together the pieces without using the spacers.
Repeat, Repeat, Repeat
Keep adding the tile and checking it with a level every time. You can move pretty quickly here, and you’ll be happy that you stacked the staggered tile sheets in the proper orientation before you started.
Keep checking the glass tile backsplash with your level
Sorry to repeat myself, but I can’t stress it enough
Cut around outlets
You can see in the photo above that I have glass tile spaces around the outlet. Since the type of tile used in this project was on a mesh backing, it was easy to use the razor and cut out the tile pieces as needed.
Set those cut out glass tile pieces aside because you’ll cut those smaller pieces down later with a wet saw and put them right there in their place.


Above you’ll see the wet saw cutting the glass tile.
Please note: When we cut the staggered blue glass tile backsplash sheets on the wet saw, glass did fly up a bit so you may want to wear safety goggles or glasses.
In order to remove the little bits of glass from the surface, I ran the tile sheet under some water after cutting on the wet saw. However, this left the backing of the tile wet.
The backing of the tile cannot be wet because wet tile will not adhere to the adhesive tile mat.
Be sure to dry it off (I used a little rag to dry mine) before pressing onto the tile backing.
One more note here: If you watch the video, you’ll notice that at this point I start to wear a glove. The reason is that I actually cut myself with a little shard of glass that was on the surface of the tile. I was pressing down the tile sheet and then I ran my hand across the surface and I cut myself. So be careful not to have that happen to you.
Cut tile around the cabinets
When it came time to fit the tile around this cabinet, I held the tile underneath the space to see where it needed to be cut. I marked it with a Sharpie, as you can see in the photo above.
However, you may not need to cut it all the way down vertically. Notice that I need to keep the bottom two rows of tile intact in order for this to look seamless. The photo below will show this better.

And look at how amazingly satisfying it was to put this piece of staggered glass tile in place. It was literally like placing in a perfect puzzle piece!

Fill in the gaps

Cut the small tiles as need to fill them into the gaps. The most time consuming part of this was the left hand edge since it required a number of small pieces. Patience was key, and it helped to mark each piece with a Sharpie prior to cutting.
One tip: When we cut the pieces for the edge, we kept the “good” side out and had the cut side in toward the backsplash so that the left hand edge would look perfect and finished smoothly.
Grout

The next morning we got to work adding the grout. We used premixed grout to keep the job simple and easy. (By the way, an advantage when you install backsplash using adhesive tile mat backing is that you don’t need to wait until the next day to add the grout)
You can see, in the photo above, two methods of grout installation.
The most typical way it to use a grout float. This tool has a plastic handle and rubber edge. Use the tool to pick up some grout. Press the grout into the grooves by positioning it at a 45-degree angle and pressing in the grout.
I have to admit, this method was difficult for me. I kept dropping the grout and I had a hard time pressing it into place evenly and I was making a mess. So, I used an alternate method of installing grout into the staggered glass tile.
I used my hands to install grout. It worked like a charm. Seriously. I had full control of the amount of grout and I was able to make sure it was packed well into the spaces. Running my hands along the tile surface allowed me to remove excess grout. Tip: Wear gloves of course!
Sponge off with damp sponge


Use a sponge to wipe off of the excess grout and clean off the tile surface.
The grout sponge should be damp, not soaking wet. You’ll run the damp sponge over the glass tile backsplash surface. Rinse the sponge and wring it out. Repeat. Over and over and over again. Don’t press into the groves because you’ll push out the grout you just applied.
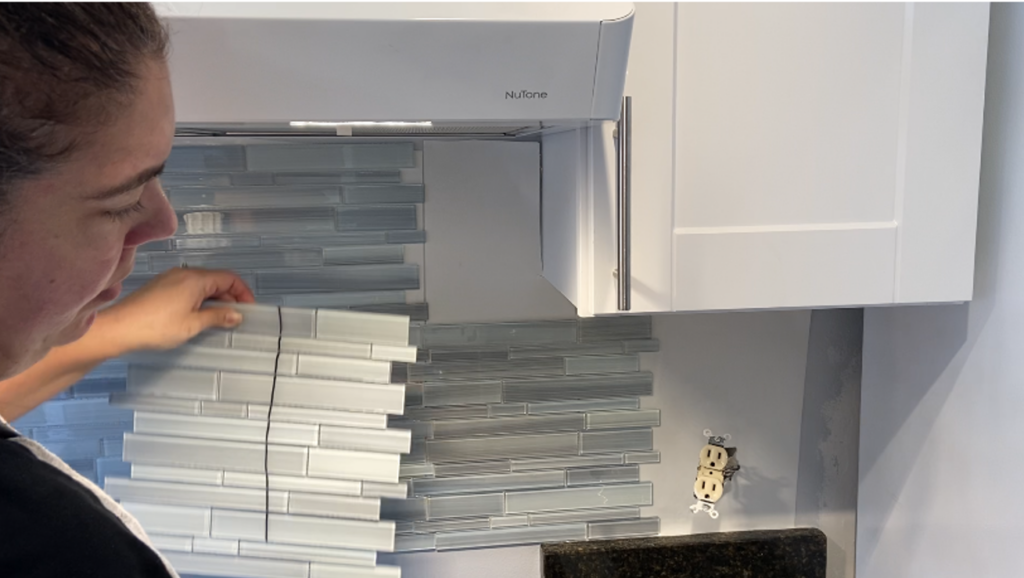
Take more pictures and show off your beautiful kitchen backsplash!
Visit my Pinterest Board to see more amazing kitchen backsplashes for inspiration.
Application of adhesive tile mats in other areas:
This adhesive tile mat worked wonderfully for out kitchen backsplash tile, however I don’t know how well it would work in other settings. For example, I don’t know that this would be a good idea for shower walls or shower floors due to the inherent moisture in these areas.
Types of tile that would look great on vertical surfaces like your kitchen backsplash
Subway tiles, square tiles, stone tiles, arabesque tiles; all of these would look amazing. I’m not a fan of the plastic feeling stick tile. I have used it before in a rental renovation, and it looked ok in pictures, but not in reality. When there are easy ways like this for you use a stick adhesive tile mat roll and sheets of tile for your backsplash use, it really looks great. You can do this, even if it’s your first time!
Finishing Touches:
You may want to use grout sealant when you’re done. Also use caulk and a caulk gun will help you seal off the entire area around the new backsplash where it touches the kitchen counters. Wipe up the excess with a damp cloth or damp rag. It’s a great way to finish off the look of your new tile installation.
If you like viewing before and after home renovation projects, please check out the Home Flipping tab above. Or check out these titles:
30 day Condo Renovation and Sale
Let’s be friends on Instagram!