
Bathroom wood slat wall
I wanted to warm up this bathroom and give the walls some depth and texture, and did so by creating a slat wall behind the mirror.
Check it out and see what you think.
Throughout my site I provide affiliate links to products that I hope will help you with your DIY project supplies. As an Amazon Associate, I earn from qualifying purchases. This means that I may receive a small commission if you use these links to purchase products, but it does not change your price in any way.
This project was part of a condo renovation that I took on using all DIY projects. Over 30 projects were tackled in this small condo and the transformation was amazing. To view them all, visit my website here.
The Bathroom Before
This was the bathoom’s starting point. You can see that it was plain and would benefit from a focal point or feature wall.

Before starting the project, the first thing I did was that I removed the mirror, updated the old fan and upgraded it to this exhaust fan with a bluetooth speaker and light (it’s super cool and now I can listen to music while I shower!)
Materials
- 1×2 pieces of wood easy to find at Home Depot or Lowe’s
- Stain of your choice (there are so many various shades, you can really customize to your taste)
- Nail gun
- Saw
Selecting your Materials:
I grabbed some 1×2 pieces of wood from the hardware store, and lightly stained them with a warm shade of stain.
A note about materials: you’ll have high humidity here in the bathroom, so choose which type of wood you’d best like to use here. I chose pressure treated pine for my bathroom wood wall panels because it stands up to moisture issues. However, many of the vertical slats had some “green” to them which was less than ideal. So, take time to look through the extensive range of products at the hardware store to make sure that you’re going to like the finished look and quality of your vertical wood slats.
?You can find common board which is inexpensive but a lot of times these pieces are a bit warped or damaged so, again, look through the variety of wood species, and pick out your vertical slat pieces yourself. The right wood is going to be worth the time and extra cost.
Staining the individual slats:
I stained my wooden wall panels, making sure to stain the sides of the slats. I didn’t stain the back side because those wouldn’t be seen at all.

Of course, if you prefer to paint yours, using a paint sprayer would be a great idea and get the job done quickly.
Cutting the vertical slats:
I used my saw (circular saw, table saw, or miter saw works here) to cut the wood panels to the height of the wall, from the countertop to ceiling.
Creating the DIY wood slat wall:
I placed the first piece in direct contact with the corner of the wall and used a nail gun to secure it in place.
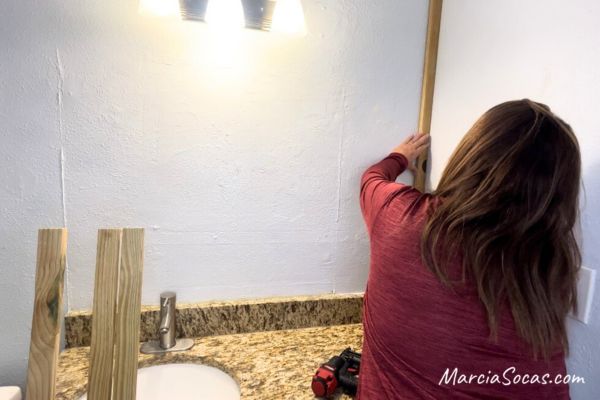
I wanted a narrow space between the wood pieces and, for this, I used the tongue of a piece of shiplap I had in the condo. It was convenient because it gave me even spacing and I was able to wedge it into place between the wood while I secured it with the nail gun.

Once I got started, it rolled along quickly. This really is an easy installation project.

Here’s how it looked when I got to the light fixture. At this point I stopped so that the light could be switched out to the new fixture.

Then I continued along and reached the end of the wall, where it touched up against the bathroom shower tile.
Extra steps:
If you have unsightly nail holes, just fill those in with a dab of wood putty, let it dry, and lightly sand those down. If you need to, touch it up with a dab of stain (or paint) so that you’ll retain your beautiful finish.
And here it is!
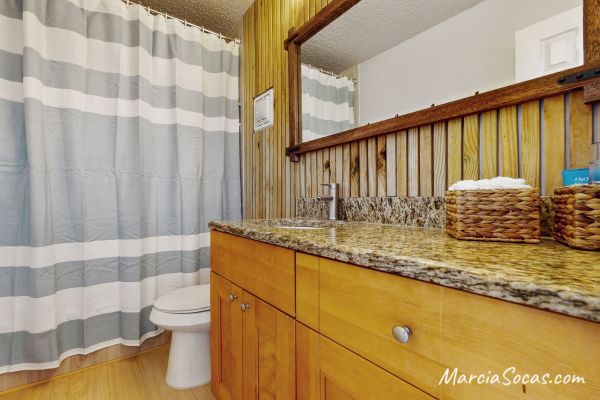
It works for this beach condo and I could also see it working well for a rustic cabin type of decor too. I love the warm feel of the wood and the look of the room overall. Once I added the mirror and updated light fixture, it really gave the final look that I was hoping for.
This photo’s a little dark but provides just a bit of a different angle.

Another great option:
?Add black for a more sleek look. If you want a more modern or edgy feel, consider moving past the back white wall, and instead paint it black. The black wall peeking out from behind the wood slat wall panels would give it a great modern look. An effective way to highlight this would be with black fixtures and accents in the bathroom room.
A different color could work in a similar way, it would be fun to see a bold color blue or some other lovely color peeking out from behind the width of the slats.
My other DIY wood slat wall (with LED lights)
If you’d like to view another project that I created using vertical slats in a bedroom, you can check that out here.
Your turn!
If you create a bathroom accent wall using this bathroom wood slat wall tutorial, then please send me a photo and I’ll post it here. I’d love to see what stylish looks you come up with!
Thanks for viewing and I hope you’ll check out the other projects and tutorials on my website.
Ship lap is much prettier
It is nice that there are lots of options (slat wall, shiplap, wallpaper, board and batten) and we can all implement what we like best in our own homes without judgement from anyone. I also do love shiplap for many projects and have several projects here on my site like a shiplap wall and a shiplap fireplace and I hope you’ll enjoy those! ?
I loved your post. I agree we all have our own personal style and even that changes from time to time. So, it is wonderful, when people like you, give us different ideas ? . Sometimes there are styles we may have not considered.
Thank you again for sharing.