
Are you looking for an easy DIY project to give your bathroom a fresh new look without spending a ton of money? Framing your builder-grade bathroom mirror with hexagonal tiles is a great option and an easy way to make a big difference in the overall look of your bathroom.
This bathroom renovation was part of a condo flip that I undertook. To view all of the DIY Projects I undertook to create a big impact without spending much money, see them all here.
In this article, we’ll go over the simple steps to create an awesome looking DIY bathroom mirror frame.
Throughout my site I provide affiliate links to products that I hope will help you with your DIY project supplies. As an Amazon Associate, I earn from qualifying purchases. This means that I may receive a small commission if you use these links to purchase products, but it does not change your price in any way.
The first thing you need to do is gather your materials.
Supplies:


Painter’s tape
You can find these materials at your local hardware store. I’ve linked to them on Amazon. You can also find them online at Home Depot or other home improvement stores.
My Starting Point
I was starting with a regular builder grade mirror in this bathroom. Here’s a look at in from two different points of view.


Prepping the Bathroom
Now, before starting work on my builder grade bathroom mirror, as a first step I first worked on some other projects in the bathroom. I added a new bathroom vanity. Actually, bathroom vanities are pretty expensive. I would have needed a 60″ bathroom vanity and they can easily cost $1000 or more. Instead, that was another easy project I worked on. I used a kitchen base cabinet that was 60″. That only cost $150, and I painted it. More on that coming in an upcoming tutorial.
But you can see, some changes were made. I added leftover vinyl plank flooring from my floor installation, added a new light, the vanity and top, and a cool faucet that cost under $50.

Now back to my large bathroom mirror…
The frameless mirror was boring and had damage showing along the edges. However, large mirrors are expensive, so I didn’t want to spend the money buying a new one. This hexagon tile mirror frame DIY was the perfect way to upgrade this boring wall mirror to an awesome looking mirror.
Prep your Mosaic tiles
The next step is to measure your mirror to get the exact size you need for your frame. Make sure to measure the entire thing, including the edges. Once you have your measurements, you can head to your local hardware store and buy your tile.
In this bathroom I used black hexagonal mosaic tiles and I removed them from the mosaic tile backing sheet before starting my project.
The reason that I removed them is because if I were to apply them just as they are on the sheet then I would have a space between the tiles where normally grout lines would go but I don’t definitely don’t want to put any grout on this project I just want to put the tiles right up next to each other and have them create one solid design.
Attaching the Tile to Create your DIY Mirror Frame

I added liquid nails to the backs of the tiles and started mounting them to the mirror I first created one row along the bottom. I didn’t worry about the mirror clips. When reattaching the mirror after adding my vinyl plank flooring background, I used flat mirror clips. Now I worked right over top of them I just added a bit more liquid nails to the pieces that were going over the little clips so that they would grip well.
The Second Row
I then added a second row and then started working my way up the sides of the mirror. Try not to get excess glue onto the surface of the tiles–I accidentally did and then had to deal with getting it off down below.
I did get a little bit of slippage of tiles and when I did I started adding tape as needed. I also alternated between working on the left side or right side just to give a chance for the liquid nails to dry a bit. It took me about 45 minutes to get the tiles done all the way around the mirror.
Working with corners
When I got to the corners you can see I added a little bit of extra support by adding almost like a third row in that little corner section.

But other than that I just did two rows all the way around. I started getting into the groove then realized that I could move quicker if I removed the hexagonal tiles and added the liquid nails to the back of them in groups of 10 or 12 and then I could just apply them right onto the mirror, put my tape on and keep moving. It made things much quicker. Continue until you’ve covered the entire edge of the mirror with tile
Of course, when I got to the top part of the mirror, I needed to add quite a bit of tape and take things slower here so that everything wouldn’t come sliding down but the liquid nails really did adhere really well and make this project move along quickly.

Drying time

I taped everything and let it dry overnight the next day I removed the tape and I love the way its looking, but there’s still some more to do to make it look just right.
We’re Not Done Yet
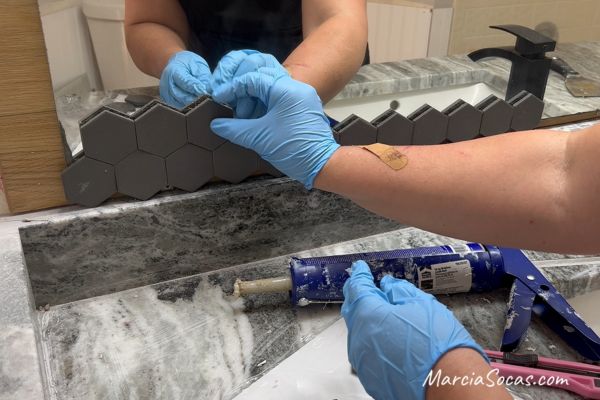
However, there are a few things that still need to be done. There’s some liquid nails that I accidentally got on to the front of some of the tiles so I needed to remove that so that the tiles would look good. I used mineral spirits on a paper towel. This did remove the liquid nails but then started leaving behind all this paper towel residue. So, I had to switch to using kind of like a lint free cloth and that worked a lot better.

I also noticed that when you look into the side of the mirror (photo above) you can see the reflection of the tiles in the mirror itself so the edges didn’t look perfect. Perhaps it wouldn’t bother everyone but for some reason it was sticking out to me, so I wanted to do something about it. I added some black caulking along the edges.

This looked like a huge mess at first, but by adding the caulk and then wiping it away with the lint free cloth with mineral spirits on it, I was able to get the caulking off of the tile and the mirror. What ended up happening is the caulking got kind of like pushed behind the tile a little bit there on the edge so that it created a really good border. I love the way it turned out.

What if I need to Remove my Mirror in the Future?
When it comes to looking at the mirror clips here’s a view of how the mirror clips ended up peeking out underneath the hexagonal tiles. So if the mirror does ever have to be removed in the future there is a way to do it.
You’ll see in my photo below that I had a small gap of mirror showing where the outer edge of the vanity mirror is. You can definitely be a little more precise with your DIY frame, but honestly, it’s a pretty forgiving project and you don’t really see this little sliver of mirror when you step back and look at it. It’s just that this close up photo makes it kind of look more obvious than it really is.

That was pretty much it! It was a quick and easy project it took me a couple of hours one night and a couple of hours the next day and made a huge transformation in this bathroom mirror for only $44.
After

And that’s it! You’ve just created a custom mirror frame that looks great and was an easy DIY project. It looks like a new frame! The best part is that you saved a lot of money by not having to buy a new mirror or hire someone to do the work for you.
This simple project can be done in just a couple of hours. It can have a huge impact on the look of your bathroom. And the great news is that this DIY mirror frame can be done on any size of mirror. So whether you have a small guest bathroom or a large master bathroom, you can create a beautiful framed mirror that will make your bathroom feel brand new.
You can also add a light fixture above the mirror, or a background to the wall like I did. These things help complete your bathroom makeover. Simply remove the old mirror clips and later you’ll reattach the mirror to the wall using new mirror clips. I personally like these flat mirror clips. You’ll attach any new light fixture to the top of the mirror using the mounting hardware that came with it.
Framing your bathroom mirror using hexagonal tiles is an affordable way to give your bathroom a fresh new look. With just a few basic tools and tile, you can create a custom mirror frame that looks great. And it’s easy to do. Whether you’re renovating your entire house or just updating your bathroom, this easy DIY project can be done.
Your Turn!
Now for the fun part, designing and creating a DIY bathroom mirror frame of your own. If you do, please send me a photo. I can upload it here for others to see and enjoy!
Creating a DIY bathroom mirror frame with tile can add a stylish and personalized touch to your bathroom decor ,By following these steps carefully and paying attention to detail, you can create a beautiful DIY bathroom mirror frame with tile that adds both functionality and style to your bathroom space.