
Creating wood shelf pantry shelving that covers up existing wire shelving.
Throughout my site I provide affiliate links to products that I hope will help you with your DIY project supplies. As an Amazon Associate, I earn from qualifying purchases. This means that I may receive a small commission if you use these links to purchase products, but it does not change your price in any way.
Supply List for my DIY kitchen pantry shelves
- Plywood from home improvement store
- Trim pieces for front of shelf (I used 1×3)
- Brad nailer
- Stain or paint of choice
- Wood filler (optional)
I had upgraded my pantry by adding some decorative floor tiles to the back wall (you can view that project here). It gave it some color, but it really, at the end of the day, just pointed out how dingy and bad the wire shelving looked. I didn’t want to pay for new wood shelves, so I decided to create something of my own. So, I purchased some sheets of plywood from Home Depot; they cost under $8 a piece.
I was going to use these for the top of my shelves.

Then, I grabbed some trim pieces to add to the front. I chose the 2 1/2 inches because I wanted to completely cover the wire shelving piece that hangs down in the front.

Measuring and Cutting
I measured the width and depth of the shelves so that I could cut the plywood. Make sure to measure the existing shelves themselves and not the pantry space. In my pantry I didn’t have very deep shelves at all. They didn’t extend all the way to the door.

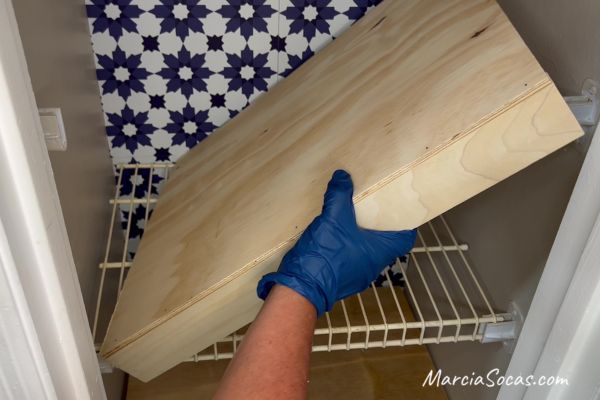
The first step was to cut my plywood to the size of the shelving as it existed in the pantry. I actually cut it just a tiny bit shorter, just so that it would slide in easily.
I used a small table saw, but you can use a circular saw or whatever works for you.
Once I had the plywood pieces cut, I cut the pine boards to the correct length.

Building the faux floating shelf
After that I just added the plywood on top of the front trim piece and I used a nail gun to secure it in place. Now, you could decide to do something fancier, like you could miter cut edges; you could use a router and make the plywood fit into the pine boards. There are lots of different ways that you can put these together, but for me, the quickest, easiest way was to just put them together using wood glue and brad nails and not really worry too much about the finish since I knew I was going to stain it and the nail holes would be covered up, and I was going to be fine with that.
Once the first shelf was done, the next ones took just minutes. It was ridiculously simple.
Of course, if you feel like you can see your nails, feel free to add a touch of wood filler on top of the nail indentation. Let this dry and lightly sand it smooth. The nail indentation will effectively disappear.
I set my wire shelving back in place and then added the new wood cover right on top of that.
Customizing my DIY kitchen pantry shelves
The next step is to customize the color of the plywood and trim board.
Once I had them all in, they looked great, but I definitely wanted to stain them to make them a little bit of a darker, richer color. I would recommend taking the shelving out and staining it somewhere outside, but I ended up just staining mine right in place.


Since I just used a rag, it was easy for me to just wipe it on. But, I have to admit that I got some stain on the side walls due to being in a hurry, so it’s a good idea to be patient and do it right the first time. (And, probably best to stain them first then put them in place)


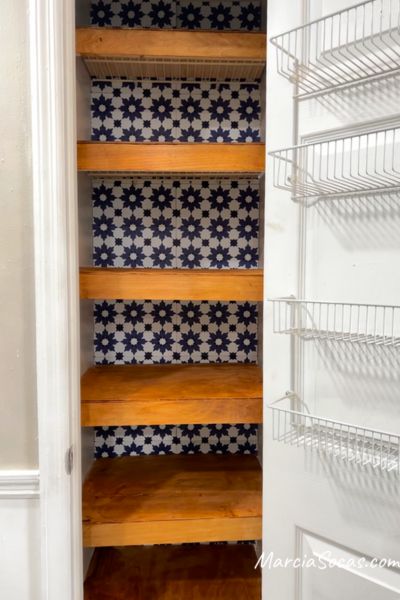
Once it was stained and dry, it really looked great. I love the stain color and the way it combined with the decorative tiles that I had placed on the back wall.


The Upper Shelf
Now, looking at this picture above, take a look at the very top shelf. You’ll see that you can still see the original wire shelving. This happens, obviously, because the DIY kitchen pantry shelves that we just created just cover the tops of the shelves. So, anytime you have very high upper shelves, you may see the original wire underneath.
If this is bothersome to you, a great option would be to take another piece of plywood and nail it into place from the bottom of the shelf to the upper piece. This would create a more complete look without adding too much weight.
If you add this second plywood securing it just to the top piece, I don’t think you’ll even have to attach it to the front trim piece. You’ll essentially just sandwich the wire shelving with two pieces of plywood. Of course, then you won’t be able to slide out and remove the shelving anymore, so make sure that you stain or add your coat of paint before securing this in place. And, if you try this, please comment below and let us know how it turned out!
100+ DIY Projects implemented in 3 renovations
My final step
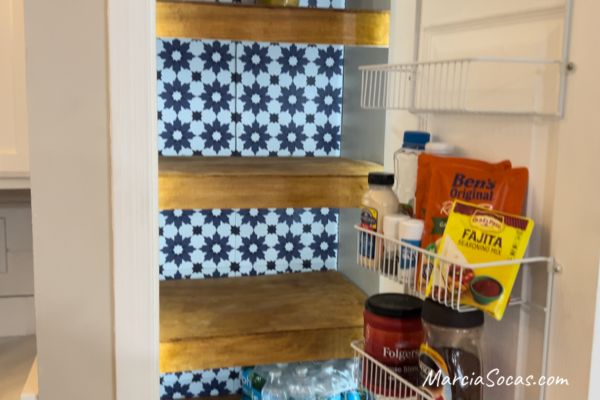
For me, the final step was adding a little bit of extra lighting to the pantry. I used these strip lights which are motion activated so that the light comes on when the pantry is opened. It looks so cool!
Now, it’s a pleasure opening the pantry door and getting this nice finished look of floating shelves, as opposed to those old, dated looking wire shelves and the plain wall in the back. It’s amazing what a huge improvement this pantry shelf DIY project made to my little pantry. Also, nothing (like small food items) slips through as it did before with the wire shelving. So, food storage and storage of smaller items is easier. I hope this inspired you to update some old wire shelving in your pantry closet.
One of the best parts of this pantry makeover is that it doesn’t require a lot of space or a huge budget. With just a few simple tools and materials, you can transform your pantry into a functional and stylish storage space. Whether you’re looking to update your kitchen cabinets or create custom pantry shelves, there are plenty of DIY options to choose from. So why not give it a try and see what you can create?
Need stronger supports in your new pantry?
Now, if you want some really heavy-duty shelves, or you’re creating new shelves, you may choose not to use the existing screw holes that the existing ugly wire shelving uses. While this new DIY pantry shelves project doesn’t add a lot of weight to the existing shelves, you may choose to take this time of renovation to strengthen the shelves in your existing pantry cabinet. If you decide to do this, you may be able to store heavier things, like small appliances rather than just food storage. In order to create stronger support pieces to your shelves, use a stud finder to identify the wall studs and be sure that your back supports and any additional side supports are firmly in the studs.
Where else would this work?
Sometimes the best part of DIY projects is modifying it for the best use in your own home. This tutorial works, not only for a kitchen pantry, but you can also implement this technique in a laundry room or another type of small pantry like a linen closet. You can buy the size lightweight plywood you need so you could create long pieces of “floating shelves” over your existing wire shelves or other supports. Once you start working on your DIY kitchen pantry shelves, you’ll find it’s so easy and so much fun, that you’ll look for another great place to add more.
Want more tutorials and DIY projects?
Sign up for the newsletter and by next week you’ll start receiving weekly projects and also have access to the free download library, where you can view and print project sheets for all types of DIY projects.
I Love This Idea and I am going to try it
Wood takes up storage space. How about counter top fabricators thick plastic template material as shelf liner, covering the metal spokes.
The beauty of this particular project is that it only looks like the wood is thick. The only space that’s actually taken up is maybe 1/8″ on the top. Then the wood facade in the front just covers the existing wire shelf front. It really doesn’t take up any space at all. The counter top plastic template would also be a good project though!