
?Easter topiary – an easy DIY Dollar tree project
I found these Easter eggs in my dollar store under the $5 section and I knew that there was something that I could do with these for my Easter decor. I envisioned an Easter egg topiary that I could DIY.
Now, if you don’t see these in your dollar store, you can try your local craft store or Hobby Lobby. They usually do have large plastic Easter eggs that’ll work. I purchased the largest I could find, but you may also find different sizes, it’s all whatever works best for you and your Easter egg topiary DIY!

Throughout my site I provide affiliate links to products that I hope will help you with your DIY project supplies. As an Amazon Associate, I earn from qualifying purchases. This means that I may receive a small commission if you use these links to purchase products, but it does not change your price in any way.
Supplies
- Giant Eggs
- Balloon Stand
- Decorative Ribbon
Getting Started
I grabbed several of the giant eggs and decided that I would stack them together vertically.
I’ve seen some projects where people take a planter and a PVC pipe and some concrete and they create like a stand that way but it seemed a little more complicated than what I wanted to get into so my mind turned to this little balloon holder stand that I had it’s just a collapsible adjustable stand that I purchased online and that is usually used to make balloon decorations with.
I love reusing things that I already have, it really helps to save money and time. But if you don’t have a balloon stand like this one, and you don’t want to purchase one, you could also get creative with your build.
One great idea might be to use a long dowel rod and create a stand of your own using a styrofoam base. You could secure the end of the dowel by sticking it into the Styrofoam. Of course, this might prove a little unsteady so you’d want to place it in something with a little more weight to it, like a terra cotta pot you might have on hand. Then you could cover the Styrofoam using a dab of hot glue, or floral pins, and securing reindeer moss or sheet moss on top. Oh, or even use some smaller plastic eggs to finish off the top, that would be cute too. I think a terracotta pot type stand like this would also work wonderfully!
Next Step : Drilling the holes
Now, back to my project at hand…. I needed to set about making holes in the eggs themselves.

I tried using my drill with a very large drill bit but every time I tried, I cracked through the egg. It’s just this thin plastic, and it just wouldn’t allow me to drill through it properly. I even tried heating up the drill bit first, wondering if maybe a little bit of heat would help push it through, but that didn’t work either.

I just kept cracking these things all over the place.
Then I had the idea to try to pinpoint some heat right onto the plastic surface. I grabbed my glue gun, turned it to high, and plugged it in. Once it was warm enough, I pressed the tip of the hot glue gun — not using any glue — just pressing the heat onto the surface of the egg.

I could tell that it was working when I looked inside the egg and could see that the egg was kind of melting through to the other side. Once I was able to get a hole started then I was able to use my drill just to make it larger so that it would fit the size of my stand.

As with most things, once I figured it out, the whole process got a lot quicker.
Placing the eggs on the stand
I made the holes in the eggs so that they would all be sitting at slightly different angles. I wanted it to look kind of haphazard and fun as opposed to straight up and down or all the eggs laying on their side.

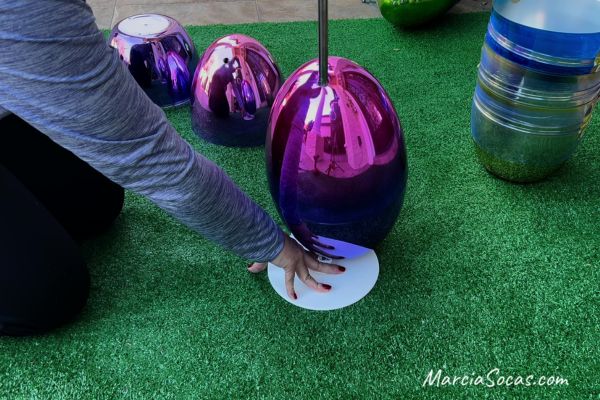

The great thing about using a stand like this is that the height is adjustable, so once I had three eggs in place, I just lowered the height of the stand and that was all I really needed.
I only wanted this stand to go to the end of the Garland that I had made in a previous tutorial you can find that tutorial here.
Decorating – the fun part
Once the stand was ready, the next part was to just give it a little bit of flair. I did this just by adding a little bit of ribbon and something on the top to camouflage the top of the stand itself.

At the bottom part of the stand I cut a little piece of this astroturf which I like to use in springtime on my table. I also use it as a little rug in front of the front door. I also use it as a basis for my Superbowl decor–I just add white tape lines and numbers to mimic a football field. Theres lots of different uses for this type of material!

I just cut a little piece and set it around the bottom of the stand so that it would cover up the white part and that was all it took. (You could also use Spanish moss here)
My Easter Egg Topiary DIY
My egg topiary was complete! It was the exact height I wanted, introduced a few different colors, and added a little bit of fun to my front door. It was the perfect complement to my Dollar Store garland, which is another easy craft perfect for this time of year.

The cost of the project was only $15 since everything else was stuff that I had at home.
I hope this inspires you to create an egg topiary of your own this Spring! I hope you enjoyed this Easter craft. You can also view a video tutorial on my social media over here on Instagram or Tiktok.
Your Turn!
If you create any Easter egg topiary DIY of your own, please send me a photo. I’d love to showcase your Easter project or your Easter door decor here too!